Deploying a ./HAVOC Campaign
Overview
./HAVOC is a post-exploitation toolkit which leverages playbooks to automate the deployment of attacker infrastrucure in AWS. It provides a method to automatically deploy attacker toolkits (such as Powershell Empire and Meterpreter) in containers, and automate interaction with them. This allows for a flexible and automated method for testing and emulating advanced attacker TTPs.
./HAVOC establishes a C2 listener via a containerized Powershell Empire, and playbooks which can be configured and run from your command line.
The ./HAVOC GitHub is located here.
Prerequisites
The prerequisites for a ./HAVOC campaign are as follows:
Personal AWS Account - Will also need a user that has full admin privileges (required)
ZeroTier - Configured and Connected to Networkd ID: a0cbf4b62a48096f
SE-Dev Win10 VM - IP addresses and credentials, connected via RDP.
An Ubuntu Linux VM (Campaign Manager) - Will manage the ./HAVOC campaign and act as the playbook operator.
Ubuntu Server Download
Build ./HAVOC Campaign Manager
If you have already deployed the Ubuntu VM to use as the ./HAVOC Campaign Manager, proceed to the next section.
It is recommended to run a local VM as your campaign manager. If you’re on an M1 Mac and prefer not to run VMs locally in Parallels, you can provision an EC2 instance in your AWS account to act as your campaign manager.
We will not provide instructions to create the Ubuntu VM as instructions will very by workstation virtualization solution and OS.
Desktop Virtualization Providers:
VMWare Fusion Preview (Mac M1)
VMware Fusion (Mac)
VMware Workstation (Windows)
Parallels (Windows & Mac)
VirtualBox (Windows & Mac (Intel Only)) Free
./HAVOC Campaign Deployment
If you don’t already have an AWS account, follow the Create AWS Account to create one now.
Create a ./HAVOC user in AWS with Admin Privileges
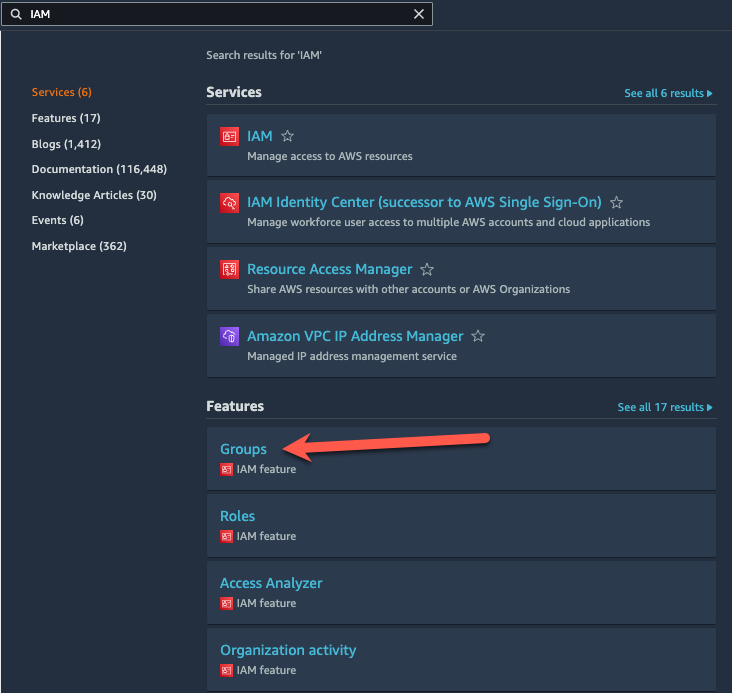
In the AWS Management Console navigate to the User groups page by typing IAM in the search field.
Select Groups under Features
Click Create Group

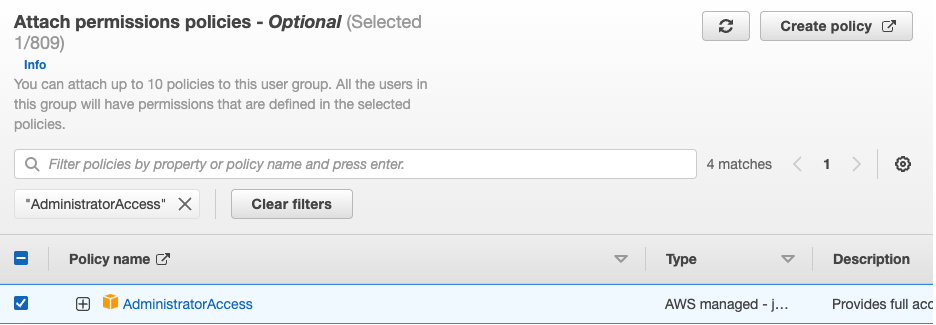
Fill in the following values, and click Create Group:
Name the group
User group name - Administrators
Attach permissions policies - Optional
AdministratorAccess - Checked
In the AWS Management Console navigate to the IAM > User page.
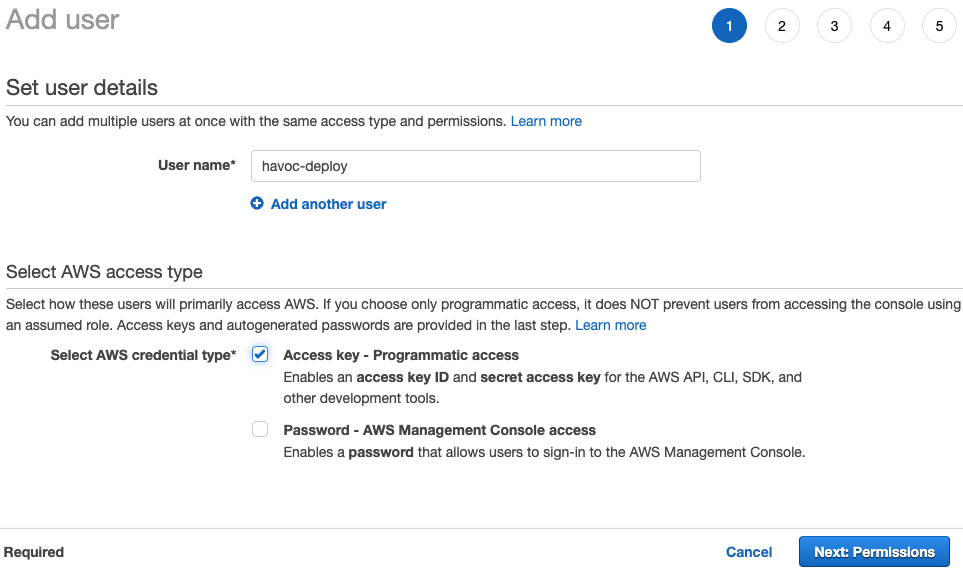
Click Add users
Fill in the following values, and click Next: Permissions:
User name - havoc-deploy
Access key - Programmatic access - Checked
Fill in the following values, and click Next: Tags:
Administrators - Checked
Click Next: Review > Create user
Note: When user creation is complete, make sure to download the .CSV file that contains the access key and secret key for your havoc-deploy user.
Stage the ./HAVOC Campaign Manager (Playbook Operator Machine) on anUbuntu VM
You will need to install the ./HAVOC campaign prerequisites on your Campaign Manager Ubuntu VM as outlined in the ./HAVOC documentation.
Install Common Packages
sudo apt update && sudo apt install -y ssh vim net-tools curl git python3-pip python3-dev python3-venv unzip
Install AWS CLI
Download the Package
x86 Version
curl "https://awscli.amazonaws.com/awscli-exe-linux-x86_64.zip" -o "awscliv2.zip"
ARM Version
curl "https://awscli.amazonaws.com/awscli-exe-linux-aarch64.zip" -o "awscliv2.zip"
Unzip the installer
unzip awscliv2.zip
Run the install program
sudo ./aws/install
Install Terraform
Download the package
x86 Version
curl https://releases.hashicorp.com/terraform/1.1.6/terraform_1.1.6_linux_amd64.zip -o "terraform_1.1.6_linux_amd64.zip"
ARM Version
curl https://releases.hashicorp.com/terraform/1.1.6/terraform_1.1.6_linux_arm64.zip -o "terraform_1.1.6_linux_arm64.zip"
Unzip the installer x86 or ARM
x86 Version
unzip terraform_1.1.6_linux_amd64.zip
ARM Version
unzip terraform_1.1.6_linux_arm64.zip
Move the terraform directory into place
sudo mv terraform /usr/local/bin
Setup AWS Profile
Now let’s setup the AWS profile for havoc-deploy. You will be prompted for:
Access Key ID - access key from CSV file
AWS Secret Access Key - secret key from CSV file
Default region name - us-west-1
Default output format - json
aws configure --profile havoc-deploy

Download and Install ./HAVOC
Download the ./HAVOC git repository into your home directory.
cd ~
git clone --recurse-submodules https://github.com/havocsh/havoc.git
Initiate the deployment process
cd havoc
./havoc -d aws
The ./HAVOC deployment script will prompt you for several inputs. Provide the following inputs to the prompts:
AWS region - us-west-1
AWS profile - havoc-deploy
./HAVOC campaign name - firstname-lastname
./HAVOC campaign administrator email - your_email_address
Task results queue expiration - 30
Enable custom domain name? (Y/N) - N
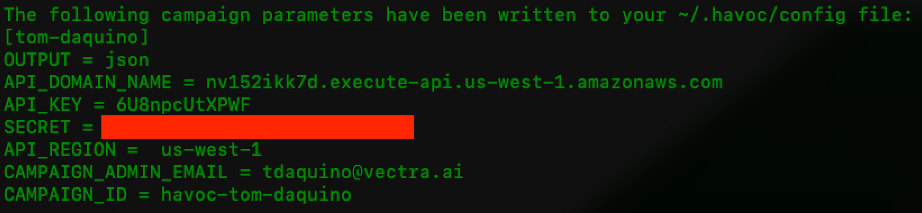
Note: The deployment process will take several minutes.Once the resources are deployed, you will be prompted for a few more inputs that will be used to configure the local ./HAVOC environment on your campaign manager machine. Provide the following inputs to the prompts:
./HAVOC credential profile name [default] - firstname-lastname
Output format (table|json) [table] - json
Note: After responding to the prompts above, the local environment will be setup and your campaign deployment details will be provided.Copy the campaign deployment details and store them somewhere safe just in case you need them again later. The campaign deployment details will look like similar to this.
You can see the entire output of the deployment script in the ./HAVOC Deployment Output reference page.
Validation
Take Screen shot of your output above. You will show it to the validator after the next lab.