MAAD Tool Setup
Overview
The MAAD Attack Tool is run from a Windows 10 host with Powershell. The tool will also automatically install several Powershell modules if they are not already installed on the host system. Previous versions of Windows may work, but have not been tested.
What is MAAD?
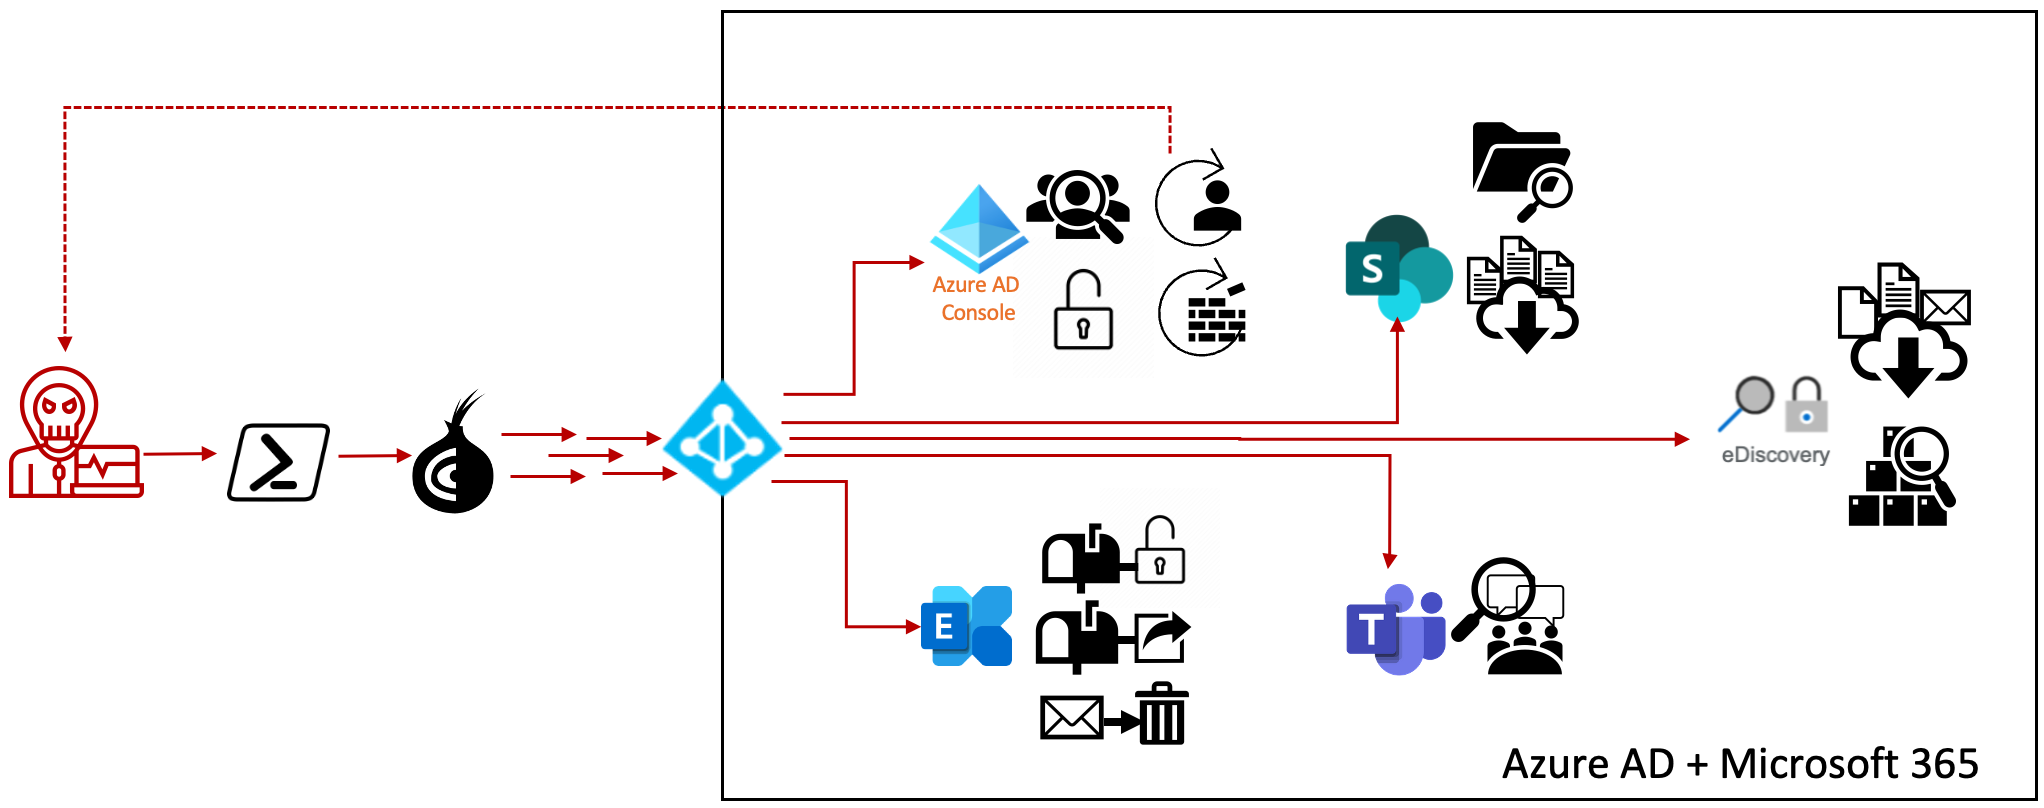
The MAAD (Microsoft 365/Azure AD) Attack Tool provides a dynamic and interactive modules for the purpose of executing typical techniques used by an attacker against a Microsoft 365 or Azure AD tenant, such as:
External and organizational reconnaissance
Gaining initial access
Establishing persistence (getting sticky)
Evading typical defenses
Collecting data and exfiltrating it
…and more!
Ultimately, MAAD allows the user to quickly execute typical actions taken by an attacker for the purpose of testing existing controls, evaluating security posture, and inspecting detections provided by existing detection platforms.
When should I use MAAD?
MAAD should be useful to a user outside the confines of this lab. The intent for MAAD is to provide a vendor-neutral framework for testing M365 and Azure AD controls. Feel free to use it with your prospects against their environment, with their consent, to both generate interesting detections during their POV and demonstrate how attackers are likely to interact with their environment, as well.
Where can I download the latest version of the MAAD Attack Tool?
For now, the Powershell scripts which back MAAD are hosted only in Vectra’s internal git repository. You may clone the git repo locally with the following command (MacOS, Linux):
git clone ssh://git@sourcecode.vectra.io:7999/tme/m365-attack-tool.git
The git command is likely also available for Windows Subsystem for Linux or a variety of other methods for Windows 10 and above users; but instructions on installing this are outside the scope of this document. Given the highly motivated technical resource that you are, however, I have little doubt that you will be able to figure that out on your own.
MAAD Attack Tool Module Arsenal
The following modules are available within MAAD as of this lab’s creation (September 2022):
Module Name |
MITRE Technique |
|---|---|
Internal Recon for Azure AD |
|
Create Backdoor Admin Account |
|
Modify Allowed IP Space |
|
Disable Mailbox Forwarding |
|
Disable Phishing Monitoring |
|
Hide Signs of Exchange Access |
|
Configure Exchange Mailbox Forwarding |
|
Enable External Teams Access |
|
Use eDiscovery for Data Exfiltration |
|
Brute Force a Password |
|
Disable Tenant-level MFA Policies |
|
Exploit Sharepoint |
|
External Recon |
|
Obfuscate Access via TOR Proxy |
Visual Representation of 0wn4g3
Initial MAAD Configuration
During the course of this lab, you will assume the role of an attacker. You will leverage MAAD to acheive several goals:
Gain access using compromised credentials
Establish persistence
Evade defenses by covering your tracks
Gather as much information as possible about your target
Find and exfiltrate confidential data
There are a few quick steps needed to get MAAD to a place where it’s ready to run.
Lab Requirements
This lab will be run entirely from a Windows 10 instance running in AWS which will be provided for you. Makes sure have the following:
ZeroTier - Configured and Connected
SE-Dev Win10 VM - IP addresses and credentials (Setup in RDP Client)
Access to SE-Dev Brain - Located at https://vlab-brain-00.vectracloudlab.com or https://10.253.255.10 if you’re connected via ZeroTier. Use the “Login via SSO” link on the login page, and your Vectra Azure AD credentials should suffice.
MAAD Azure AD Account - Provided in Account Assignements spreadsheet on the GTS2022 Landing Page
MAAD Azure AD Username - Provided in Account Assignements spreadsheet on the GTS2022 Landing Page
However, if you choose to run MAAD outside of this lab environment, or are walking a customer or prospect through the process, you would need the following:
Windows 10 host (physical, virtual, cloud, anywhere)
Powershell 5+ (If you’re on Windows 10, this shouldn’t be a problem)
The MAAD attack tool
A Microsoft 365/Azure AD tenant to victimize (This is provided for you in this lab)
The associated files for MAAD on the desktop:
Attack_main.ps1
TOR_Proxy.ps1
passwords.txt
MAAD itself will attempt to load a few Powershell modules and download them if they do not exist. You should not need to install these manually; however, if you choose to do so ahead of time, or you or your customer/prospect are curious as to what the requirements of the tool are, the list is provided below (as of September 2022):
Az
AzureAd
MSOnline
ExchangeOnlineManagement
MicrosoftTeams
AADInternals
Microsoft.Online.SharePoint.PowerShell
PnP.PowerShell
MAAD Setup Steps
Use an RDP client to connect to your Windows 10 VM in SE-Dev (Cloud Lab).
Once you have logged in, please ensure the following files are present on your desktop (These are the two Powershell scripts for the MAAD Attack Tool, and a simulated password dictionary file):
Attack_main.ps1
TOR_Proxy.ps1
passwords.txt
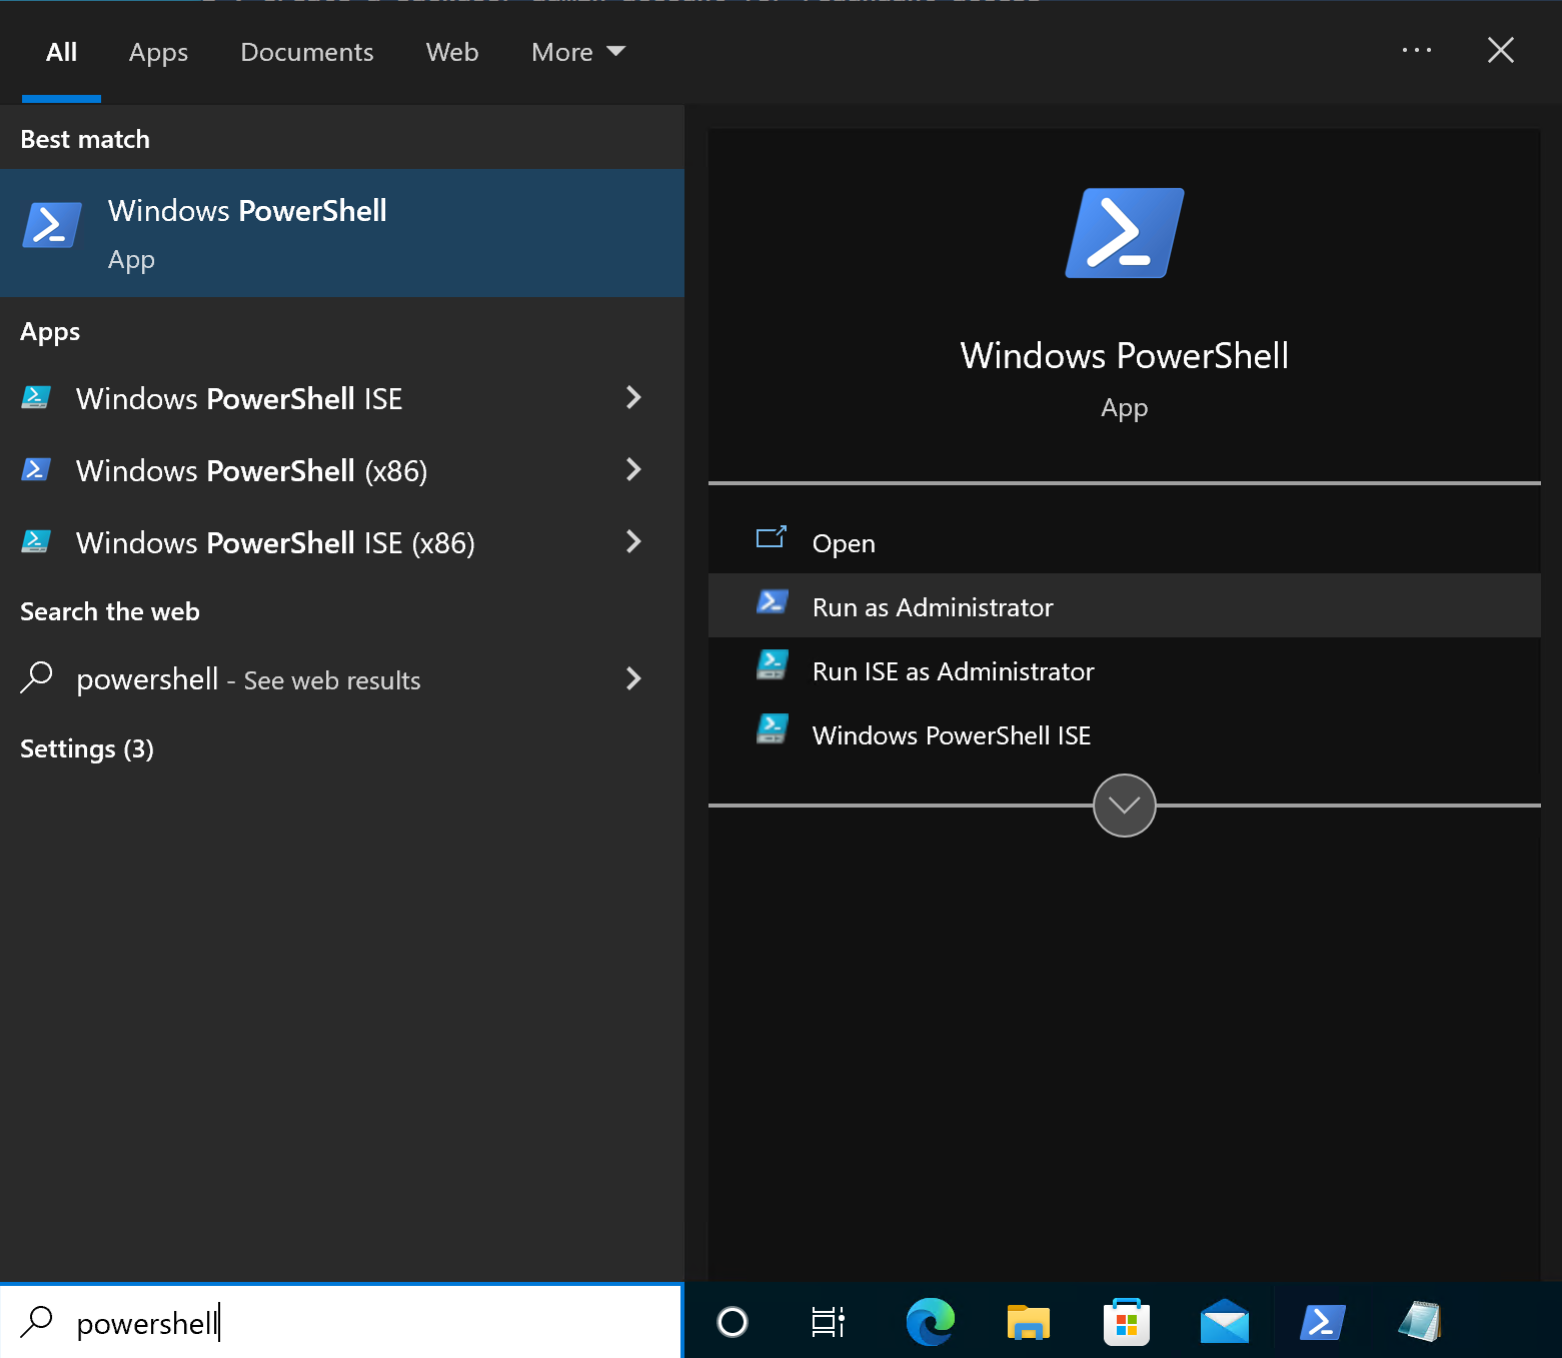
Note: If the files are not present, please let a lab administrator know, and they can be placed there.Once you have a desktop, open Powershell. You will need to Run as Administrator, as shown below.
Once your Powershell terminal window is open, execute the following commands to launch MAAD:
cd ~\Desktop\MAAD
.\Attack_main.ps1
MAAD should launch, with output that looks similar to the below.
When prompted, press Enter
 Note: If a security warning is presented, it should be fine to tell it to Run Once by entering "R".
Next, the MAAD script will list some Powershell modules that it must install, and ask you if it should check for any of them which are missing.
Type Yes, and the script will begin searching for existing Powershell modules and downloading them as necessary.

The script may take several minutes to download any missing modules, so be patient. Fortunately, once the modules have been downloaded, subsequent runs should be much faster.
Note: Red error text or yellow warning text above a missing module may occur, and is normal. See the below screenshot for an example.
Finally, MAAD will ask you if you want to keep your traffic anonymous. What this does is use the TOR_Proxy.ps1 script to anonymize your traffic over Tor network.
For this lab exercise, we will be answering No to this question.
 Note: For a prospect, you may wish to say Yes to this option.
There are a few more modules that need to be loaded, however connecting to an M365 Tenant over Tor will generate its own bonus detection.
Results
At this point, your MAAD Attack Tool should be ready to proceed with the lab and begin attacking an M365/Azure AD tenant! Your screen should be displaying text similar to the screenshot below.

Validation
Take Screen shot similar to the image above, but type your username at the prompt simply to show a unique screenshot (do not hit enter!) You will show it to the validator after the next lab.
